• Home
  • Products
  • Purchase
  • Support
  • Company

CompuClever Blog

How to Choose a Good USB Data and Charging Cable

March 6, 2017 by Charles Edward

You may have noticed that no two USB cables are created the same. Why does one USB cable seem to charge your devices more quickly than another? To help you answer this question, we’ve created this short guide about what to look for when you buy a new USB charging cable.

Some USB chargers will charge your devices more quickly than others. However, your charger is not the only determining factor. The wrong USB cable can also slow down charging speeds.

The Lower the Gauge, the Faster the Charge

It all has to do with the gauge of the internal wires that make up your USB cable. “Gauge” refers to the thickness of the wires; the higher the gauge, the thinner the wire. Cheaper USB cables will often have thinner wires.

Thinner, higher-gauge wires are obviously made with less material and therefore cannot deliver as much current – charging will take longer. This is because a thicker wire reduces electrical resistance and allows for a better flow of electrons.

The length of your USB cable also affects how fast you can charge your device. For example, cheap, short cables may charge your device fairly quickly, while cheap, long cables could take longer.

Nylon Braided USB Cable With Metal Plug for iPhone/Android 1M-1.5M

What to Look for When Purchasing a USB Cable

There are two common types or gauges of USB cables: 28AWG and 24AWG. Once again, the gauge refers to the thickness of the wire inside the USB cable. And, somewhat counter-intuitively, the lower the gauge, the thicker the wire–24AWG is thicker than 28AWG.

So, a USB cable that uses 24AWG wire should charge your phone or iPad faster.

28/28 versus 28/24?

Another fact to consider is most USB charging cables include both a data wire and a charging wire. Cheaper USB cables will be identified as “28/28”–this means the cable uses 28AWG wire for both data and charging. “AWG” is an abbreviation of “American Wire Gauge”, and is a standardized wire gauge used by electronics manufacturers.

A 28/28 gauge will charge more slowly, while a 28/24 gauge cable, thanks to the presence of 24AWG, can handle up to 2amps. The maximum the 28/28 will provide is 500mAh which can be considered slow charging.

And, as we mentioned previously, the higher the amps, the higher the flow of electricity to your device. And the higher the flow, the quicker it can charge your phone or tablet.

So, if at all possible, always look for a 28/24 gauge USB cable. The 24AWG will charge faster, and this is usually the kind of USB cable that is included when you buy a tablet or smartphone.

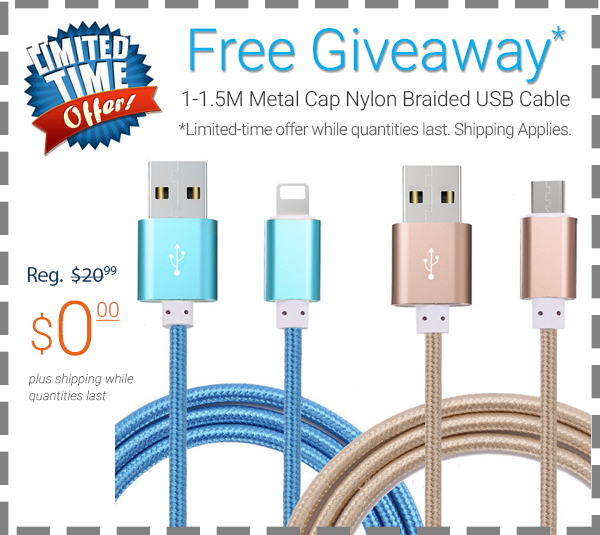
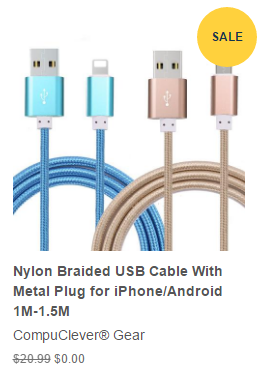
Top Quality USB Cable – Free Giveaway

CompuCleverGEAR.com is currently giving away a limited number of Nylon Braided USB Cable With Metal Plug for iPhone/Android (1M-1.5M), while quantities last. This USB cables is probably the strongest USB cable you can find on the market and it features:

  • 28 AWG / 24 AWG gauge and USB 3.0 support for faster charging and file transmission
  • Braided-nylon fiber jacket and anodized aluminum shell for strong protection and durability
  • 1 meter or 1.5 meter length with metal end cap

Regularly priced at over $20.00, this high-end USB cable is currently free – you just have to pay shipping + handling.

Region Capture

Filed Under: Blog, Gears and Gadgets, USB cable Tagged With: data cable, USB cable, USB charging cable

Speed up Your PC with ReadyBoost

March 2, 2017 by Andy Thompson

All PC users have likely experienced the frustration related to slow performance.  There’s something just not right about having to wait for your PC to switch from one application to another.  We want to multi-task and we want a PC system that does not suffer any delays.  And, we ask, why not?  It’s an extension of what we are capable of.  So what are the choices in dealing with slow performing systems?  We can keep our original PC just as it is with very few applications (not taking full advantage of its capabilities and not much fun).  We can live with frustration and wait for the PC to respond when it is slow.  We can look at the costs associated with adding more RAM or increasing other hardware.  Instead of these options, we suggest a fast, easy, free alternative offered by Microsoft called ReadyBoost.

In our previous article we provided information about USB technology including USB flash drives.  With that information in hand you are ready to speed up your PC with ReadyBoost.  Let’s start with an overview of the technology.

Who Will Benefit?

Using this technology is best for users with 8 GB of RAM or lower, using a traditional spinning platter hard drive (HDD), and an operating system of Windows Vista or higher.

How to determine how much RAM you have:
Do one of the following:

  1. Open up your Computer window (Windows / File Explorer), locate: Computer (or “This PC”), right-click and select Properties.
  2. Open up the Control Panel and select: System and Security and in the “System” section select View amount of RAM and processor speed.

In the window that appears you can now view the specific operating system, the amount of physical memory (RAM), and other system information.

ReadyBoost will have little performance improvement or will be irrelevant if:

  • You already have a lot of RAM (> 16 GB) on your system
  • You are using a SSD drive.

The Technology:

From the many articles we have passed on to you in the past, you likely have a good idea that CompuClever programs such as PC TuneUp Maestro and PC Clean Maestro can regain performance that has been lost due to: defragmentation; clutter of junk files and unwanted applications (leading to the reduction of available space).  These tools can also assist you when faced with a bogged down Internet connectivity as well as using functions related to improving browser speed and startup speed.

Now we can shine some light on a technology that can take your PC as it is, and can extend its performance abilities.  Keep in mind we still recommend that you enhance your performance through regular clean up and maintenance.

The basics of the technology involve being able to cache data to a device.  In this case, the device is a USB flash drive.  You can also use CompactFlash and SD cards.  How it works is that data is temporarily stored on the flash drive so that it can be retrieved faster than using the internal hard drive and available memory (RAM or “Random Access Memory”).  Flash memory, such as a USB drive or SSD (Solid State Drive), benefit from faster seek times than standard magnetic hard disk drives.  The only limitation is that USB flash drives will wear out in time.  By some estimates[1] this won’t be for approximately 10 years.

Here’s How To:

You can begin by using a USB flash card that has at least 1 gigabyte (GB) of available space.  For best results, use a flash drive or flash memory card with at least double the amount of available space as the amount of memory (RAM) in your computer.[2]

Flash memory card specifications:

  • You can use a maximum of 32 GB of available space on any single removable storage device.
  • The USB flash drive must support USB 2.0 or higher and your computer must have at least one free USB 2.0 port to plug in the drive.  Note: ReadyBoost works best if you plug the flash drive into a USB port directly rather than an external USB hub shared with other USB devices.
  • Most memory cards work with ReadyBoost.  Different kinds of flash memory cards include CompactFlash and Secure Digital (SD).  Note: Some SD memory cards don’t work well with ReadyBoost due to issues with the SD card interface.  ReadyBoost displays a warning message in these cases.

To enable or disable ReadyBoost:

  1. Plug a USB flash drive or flash memory card into an available port.
  2. The Autoplay dialog box appears.  Under the General options, you can click Speed up my system.
  3. The Properties dialog box opens.  Note: You can also access this dialog any time by opening the Computer window (Windows / File Explorer), right-clicking the drive, and selecting Properties.Next, click the tab: ReadyBoost.You can then do one of the following (as seen in the image here):
    • To turn ReadyBoost off, click: Do not use this device.
    • To use the maximum available space, click: Dedicate this device to ReadyBoost.  Windows will leave any files already stored on the device, but it’ll use the rest of the space to enhance system performance.
    • To use less than the maximum available space on the device, click Use this device, and then move the slider to choose the amount of available space on the device you want to use.
  4. Click OK.

Windows displays the recommended space to use for optimal performance.  If there isn’t enough space for ReadyBoost, a message is displayed telling you to free some space on the device.

The Benefits:

Our CompuClever team members have used ReadyBoost on a few systems that were so slow we faced having to replace them.  We noted significant gains in performance of these computers.  For systems that have only 2 or 4 GBs of RAM, the performance gains are significant.

We researched test results for ReadyBoost and found a very good site.  Here is a list of improvements as well as situations where there are no performance gains.

When enabling ReadyBoost on a system with low amounts of RAM, you can experience:

  • Opening media files like photos, music or video is slightly faster (approximately by 2%).
  • The loading of web pages and the use of Office applications is slightly faster (approximately by 2%).
  • Your system’s boot timings are improved (up to 7%).
  • Your most used applications start faster (by 10 to 15%).

This same site states:

You will not notice any difference with ReadyBoost enabled when you play games or you run applications that are CPU or GPU intensive.  Also the improvements get smaller when you add more RAM.  On a system with more than 4GB of RAM you will not notice anything getting better.  Also, adding an SSD drive to your computer means that there is no point in using ReadyBoost.  We’ve done some very quick tests after adding an SSD and we quickly noticed that ReadyBoost becomes irrelevant.

Ejecting Flash Drives:

It is good practice to eject flash drives that are in use.  This means closing windows and applications using the device and then using the Safely Remove Hardware icon.  In doing so, you eliminate the risk of losing data or experiencing data corruption – especially when files are being transferred.

To properly eject a drive:
Use the Safely Remove Hardware icon and eject your device before pulling it out of the USB port.
You can also locate the drive in the Computer window (Windows / File Explorer) right-click it, and select Eject.  Windows will tell you when it’s safe to remove the device thereby eliminating any chances of data corruption.

The exception:

In our research we found that:

Microsoft does not require ReadyBoost devices to be ejected before being removed. The ReadyBoost files are simply a cache for the real files being written to disk and removing the drive without ejecting does not harm the system.[3]

In fact, you can leave your ReadyBoost enabled drive inserted in the port and shutdown your system.  In this way, when you start up your PC you can also enhance startup time performance.

Summary:

There are few disadvantages to this free technology.  You need to dedicate a USB port for your drive (using a USB hub is possible but not preferred).  Also, your flash drive will eventually need to be replaced… but before that happens you’ll likely have purchased a new system entirely.  Cost is not really a factor though.  Flash memory drives are fairly inexpensive and certainly not as much as installing new hardware or buying a new system altogether.

Given all this, we strongly feel that ReadyBoost can extend the life of older PCs that are lacking the necessary RAM and are not able to keep up in a fast computing world.  We hope you enjoy the benefits as we have.

We will continue to provide story lines like this that benefit all of us and we will describe them in a manner that is within reach of everyday computer users.  If you have some ideas of topics you would like us to cover, email us at: newsletter@compuclever.com


[1] https://en.wikipedia.org/wiki/ReadyBoost
[2] http://windows.microsoft.com
[3] http://www.howtogeek.com/

Filed Under: computer fixes, improving performance, increasing speed, Newsletter, PC hardware, Uncategorized, Windows tips Tagged With: ReadyBoost, Speed, USB

How to Identify Your Windows Version and Edition

February 15, 2017 by Andy Thompson


Can you guess what version of Windows is the most popular among all PC users? Is it Windows 10, Windows 8.1, Windows 7, or even Windows XP?

Answer: Windows 7. According to NetMarketShare.com, Windows 7 dominates over 45% of the entire desktop market.

Do you know how to identify the version and edition of your Windows Operating System (OS)? Sometimes, it is critical that you have all the necessary version and edition information, including the type of system, whether it is 32-bit or 64-bit. For instance, when you need to refresh, repair, or even reinstall your Windows OS, you must have all this data ready. This article instructs you how obtain it.

The System Properties Dialog Box

It turns out that you can find the complete set of Windows version and edition information from the System Properties dialog box. It provides an overview of your PC’s hardware and OS information including Windows OS version, edition, and system type.

For instance, the System Properties dialog box shown above provides us with the following information:

  • Windows OS version: Windows 7 (Windows Edition section)
  • Windows 7 edition: Windows 7 Professional (Windows Edition section)
  • System type: 64-bit OS (System | System type section)

To summarize this and to use the most technically correct format, we can say this PC is running: Windows 7 Professional (64-bit). As you can see, once you have the System Properties dialog open, it’s not too hard to identify this key information. But how do you open the System Property dialog box?

Use a keyboard combination

If you are feeling “geeky”, try this keyboard combination: Windows + Pause/Break, that is

  • Press and hold down the Windows key, and then
  • Press the Pause/Break key (usually located in the top-right corner of your keyboard)

This trick works for Windows 10, 8, and Windows 7 on most keyboards.

If this doesn’t work for you, don’t panic! There are other ways to access the System Property dialog box.

Windows 7

  • Click the Start button.
  • Click Control Panel from the list in the right margin.
  • In the Control Panel, select System and Security From the list of categories on the left pane.
  • From the Systems section on the right, select either the section title System or View amount of RAM and processor speed.

This opens the System Properties dialog box.

Windows 8

Method One – The Quick Link Menu

This method takes advantage of the Windows Quick Link menu.

  • Hold down the Windows key and press X at the same time to open the Quick Link menu as shown above.
  • Select System from the list of commands.

Method Two – Access the Control Panel

You can always access the System Properties dialog box from the Control Panel.

  • Click the Start button.
  • Click Control Panel from the right menu.
  • Select System from the list of items.

Windows 10

Method One – The Quick Link Menu

This method uses the Windows Quick Link menu which is almost identical to the one used in Windows 8.

  • Hold down the Windows key and press X at the same time to open the Quick Link menu as shown above.
  • Select System from the list of commands.

Method Two – Search for System Properties

  • Click the Start button.
  • Type the word “system“.
  • Windows 10 will display the System Properties tool under “Best match” as shown above.
  • Click System.

Did You Get It?

By now, you should be able to:

  1. Master at least one method of opening the System Properties dialog box, and…
  2. Know how to extract your Windows version, edition, and system type information.

We hope this blog helps you become more familiar with your PC. Should it require some kind of repair, refresh, or even reinstall, you know exactly what you will be dealing with.

Last but not the least, you can impress or even help your friends and family by applying what you’ve learned in times of need!

Filed Under: Blog, computer fixes, Newsletter, Windows 10, Windows 8, Windows tips Tagged With: System Properties, System type, Windows edition, Windows version

How to Identify and Avoid Fraud

February 3, 2017 by Charles Edward

Fraud can be dangerous for even the most savvy individuals. However, with a little knowledge, and some handy online tools, anyone can defeat online fraud.

Online fraud, especially phone scams, is a big business these days. Someone official-sounding phones you up, and the next thing you know they have somehow persuaded you to hand over your banking information.

Law enforcement agencies are powerless to hunt down the culprits — there are so many scams that police are overworked.

Compounding the problem is that there are a stunning variety of successful scams that you must avoid, and police must somehow track.

For example, technical support fraudsters will trick you into downloading harmful software that holds your computer for ransom unless you pay. In another fraud, “IRS scammers” phone you up and bully you into paying for back taxes.

Fraud can be dangerous for even the most savvy individuals among us. However, with a little advance knowledge, and some handy online tools, anyone can defeat online fraud.

Let’s take a look at two common scams.

Technical Support Fraud

Have you ever received a phone call from someone claiming to be from “Microsoft technical support?” If you haven’t, you will soon. Welcome to the world of “telephone support fraud.”

With this scam, the fraudster phones you up at home and says Microsoft or some other large company has detected a problem on your PC. The scammers then trick you into installing malware (a harmful software program) that wreaks havoc with your computer.

What’s in it for the telephone support fraudster? They tell you you have to pay them in order to remove the malware from your computer. Unfortunately, what they’re really hoping to get from you is your credit card number.

The malware remains on your computer, making it unusable, while sending sensitive information over the to the scammers. And someone, somewhere in the world, is using your credit card to make purchases in your name.

Tax Collection Fraud

Tax collection fraud is also another dangerous variety of fraud that is out of control. In this scam, fraudsters phone you up to tell you there is a problem with your taxes. They then pressure you to fix the problem by paying up, fast, right over the telephone (once again, with your credit card, of course).

In fact, while some “government” callers and emails may demand money, others will say you have a tax refund. The scam caller will then try to trick you into sharing your private banking information. Or you may be sent to a fake website where you input banking information.

Once they have your account details, they may be able withdraw money from your bank, and can never be caught.

It’s a lucrative “business.” Just one recently discovered IRS scam was collecting $90,000 to $150,000 a day for over a year.

How Scammers Trick You

No matter how you encounter them, scammers rely on a variety of tactics to trick you, including:

  • They may know a lot about you (your name, telephone number and address are all available online).
  • They “spoof” email addresses to make themselves look official.
  • They can alter your caller ID to make it look like the government tax office or Microsoft is calling.
  • The callers use fake names, important-sounding titles, and bogus identification numbers.
  • They may send you to fake websites that collect your information.

Needless to say, if you get one of these calls or emails, don’t phone or phone back. And don’t visit any websites mentioned in such an email, either.

How to Identify and Prevent Online Fraud

Identifying technical support fraud, where tech support from Microsoft calls you up about a problem with your computer, is pretty simple.

For one thing, the Microsoft Corporation has absolutely no way to tell if there is something wrong with your computer.

Microsoft never phones individual computer owners anyway.

So, if someone calls you up from Microsoft or some other big technology company, you can be pretty sure they’re up to no good.

5 Ways to Identify Tax Collection Fraud

Identifying fake tax collectors is a little more tricky. Most of us hate to think we are in trouble with the tax man. We’ll do anything to make things right, which means we may make some bad decisions over the phone.

To keep yourself safe, just remember no government agency, including the tax collector will:

  1. Call to demand immediate payment, nor will they call about taxes owed without first having mailed you a bill.
  2. Demand that you pay taxes without giving you the opportunity to question or appeal the amount they say you owe.
  3. Require you to use a specific payment method for your taxes, such as a prepaid debit card.
  4. Ask for credit or debit card numbers over the phone.
  5. Threaten to bring in local police or other law-enforcement groups to have you arrested for not paying.

Conduct Your Own Online Background Checks

This is not something that an antivirus product can help you unless the caller’s identity can be identified as pushing virus/malware. However, an online background check or even a simple reverse phone lookup could sometimes help you to make the right decision.

The two services that we recommend are:

Reverse Phone Check

reverse_phone_336x280

Reverse Phone Check allows you to search more than two billion records from any device, including your desktop computer, your tablet or your smartphone. All you have to do is type in the number on your call display, and confirm the identity of who is calling you. The website recognizes all types of phone numbers: mobile, landlines, prepaid, business, unlisted and even Voice Over IP.

eVerify

everify

eVerify  also scans more than two billion telephone listings. What’s more, eVerify provides an even more comprehensive background check by searching:

  • Name
  • Telephone number
  • Street address
  • Email address

By using this information, you can check up on the background of anyone you don’t know who has contacted you by letter mail, email or by telephone. eVerify also provides extensive background check information that covers:

  • Criminal records
  • Police Records
  • Marriage and divorce records
  • Property records
  • Asset search

You may be able to determine everything from current and previous addresses, to related phone numbers, email addresses and social profiles associated with the caller.

With either of these services, you can check to see the background details on anyone who’s calling you, or even people you consider dealing with either online or in person. This helps keep you safe and secure.

Protect Yourself Against Online Scams and Frauds

Scams are becoming more common each month, and there’s little law enforcement can do to stop them. However, there are ways to identify fraudsters make sure you are protected.

First of all, be aware there are scams out there. Next, remember to always find out who is contacting you, and confirm they are who they say they are. Finally, remember there are great tools such as Reverse Phone Check and eVerify that let you examine telephone numbers, street addresses and even email addresses to find out almost anyone’s identity.

It’s all about keeping safe and protecting yourself against fraud.

Filed Under: Blog

CompuClever Antivirus PLUS – VB100 Award!

January 31, 2017 by Andy Thompson

 
CompuClever is pleased to release the latest VB100 test results for CompuClever Antivirus PLUS.  We will present these results and help you to understand them as part of our ongoing testimony to the effectiveness of our AV product.  As is evident with these results… CompuClever Antivirus PLUS offers outstanding protection without slowing down your PC!

The Test Results

We’ve had four positive test results from the VB100 test lab, one of the few independently operated testing facilities focused on providing comprehensive examination of security software and solutions.  Let’s start with an overview of these four tests that are available for online viewing.  These tests were conducted between August 2015 and October 2016 on various Windows platforms.

Overview & Breakdown

The specific results of each test are based on test markers which you can get an idea of when you mouse over the column title (RAP Score, Performance impact %, etc.)  We define them here:

  • Platform:  This is the selected operating system that VB100 performs its test on. VB100 tries to cover a spectrum of the most popular Windows OS with their tests focusing on one version at a time.  Note:  CompuClever Antivirus PLUS supports Windows 10, Windows 8, 7, Vista, & XP.
  • Result:  This is the overall result; simply put, it reveals if the antivirus software passed or failed the test.
  • RAP Overview:  “Chart shows RAP scores with weighted average overlaid.” Note: The difference in scores is explained below.
  • RAP Score:  “Weighted average detection rate over recent malware samples, including retrospective coverage of new malware (Reactive and Proactive).”  Basically, this means the ability for the AV product to detect and react to malware threats.  This is the most important measure of how effective any AV product is; the higher the score, the more effective the product.
  • Performance impact (%):  “Increase in time taken to complete a set of common tasks.”  This is the impact to system performance by the AV product when in operation. A lower score is better here.
  • Stability Rating:  “Rated on a five-level scale from Solid (no problems) to Flaky (severe issues).”  This is the rating given by VB100 based on the test results. This tells you the quality of the AV software apart from the previously mentioned effectiveness or performance impact measurements.

What is evident in these results is a consistent pattern of high RAP Score – detection of AV threats – and a low performance impact.  Once again this means that CompuClever antivirus PLUS works to protect your PC from online malware threats all the while operating in the background.

In this way, you won’t notice it and it won’t have an impact to overall system performance – something CompuClever dedicates itself to accomplishing!

Overall Conclusions

Based on analysis of detailed test data, we are very pleased with the results of the tests. These results are in line with our original goals:

  • Total protection against any form of online threats: CompuClever Antivirus’s high RAP score is among the list of top security solution providers, like ESET, Kaspersky, Bitdefender, and AVG.
  • Minimum impact to PC performance: CompuClever Antivirus’s extremely low % in Performance Impact to PC performance outperforms most of our top competitors.
  • A solid and well-built antivirus product: It is easy to install without reboot, has an intuitive user interface, and is extremely intelligent and quiet. CompuClever Antivirus is regarded as a “solid” antivirus solution.

This is what VB100 lab says about us in one of its test remarks:

The design is slick and attractive, with a good range of options available and intuitive deployment of controls.

Stability was perfect throughout testing, with not the slightest shake even under heavy stress. Performance impact was decent too…

Detection was as excellent as one would expect, with good scores everywhere.[1]

Check Your AV Product

We invite you to examine the results for your AV product.  You can trust VB100 as it a free service that performs regular independent reviews of malware solutions and provides test results for AV software that handle both known (reactive) and unknown (proactive) virus samples. You can see the latest test results for any product or you can use the Search field to quickly find test results.

CompuClever Antivirus PLUS

CompuClever Antivirus PLUS offers unparalleled security technology against malware threats. It is designed to deliver the best performance for your PC and it is built on the most advanced antivirus technology available today. Exceptional in its ease of use, it allows you to handle security with a single click. The intuitive technology also guards your online privacy and digital identity with specific protection when doing online banking and online shopping.

Browse the following topics to learn more about Antivirus PLUS:

  • Do you have to sacrifice PC speed for protection?
  • How to safeguard online banking
  • How to protect your personal identity
  • Does your antivirus bark all the time?
  • How to surf the web safely


[1]https://www.virusbulletin.com/

Filed Under: Antivirus, online security, Protect online privacy Tagged With: antivirus, online security, pc performance, VB100

  • « Previous Page
  • 1
  • 2
  • 3
  • 4
  • 5
  • …
  • 30
  • Next Page »

Don't miss out

Get a copy of "5 Tips for a Fast PC" when you sign up for our free "PC Tips" newsletter.

Subscribe Now
Archive Newsletter

Recent Posts

  • Ultra File Opener 5.7 Release Note

    Ultra File Opener 5.7 Release Note

    July 24, 2018
  • How Blue Light Affects Your Health and What to Do About It

    How Blue Light Affects Your Health and What to Do About It

    May 11, 2018
  • How to Protect Your Privacy & Identity on Facebook – Part 2

    How to Protect Your Privacy & Identity on Facebook – Part 2

    April 18, 2018
  • Facing the Truth – Facebook & Privacy

    Facing the Truth – Facebook & Privacy

    April 7, 2018
  • Spectre and Meltdown:  Massive Security Holes Impacting All Mac and PC devices

    Spectre and Meltdown: Massive Security Holes Impacting All Mac and PC devices

    January 12, 2018
  • How to Fix Computer Sound Problems

    How to Fix Computer Sound Problems

    December 19, 2017
  • Correct Ergonomics Sitting at a Computer Desk

    Correct Ergonomics Sitting at a Computer Desk

    November 17, 2017
  • Five Useful Tips and Tricks for Windows 10

    Five Useful Tips and Tricks for Windows 10

    August 27, 2017
  • Going Incognito – Browse Web in Privacy Mode

    Going Incognito – Browse Web in Privacy Mode

    August 4, 2017
  • Don’t be Held at Ransomeware

    Don’t be Held at Ransomeware

    July 14, 2017
Contact Us | Privacy Statement | Terms of Use | EULA | Partner With Us | Uninstall | Blog
CompuClever© Systems Inc. 2023 All rights reserved.
Microsoft is a trademark of the Microsoft group of companies. All other trademarks are the property of their respective owners.