• Home
  • Products
  • Purchase
  • Support
  • Company

CompuClever Blog

A Quick Start Guide for Digital Care ReadyBoost USB Disc

July 10, 2017 by Andy Thompson


Thanks for choosing Digital Care ReadyBoost Disc, featuring Microsoft ReadyBoost technology. Before you start, please save all your documents and exit all running applications. Follow the steps below to install your Digital Care ReadyBoost Disc and optimize your PC.

Step 1. Insert the Digital Care ReadyBoost Disc to a USB slot of your choice.

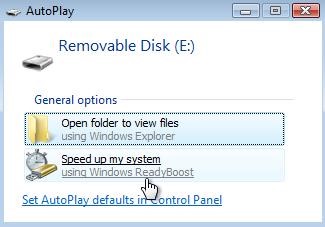
Step 2. If AutoPlay/AutoRun is enabled, you can click the Speed up my system using Windows ReadyBoost option.

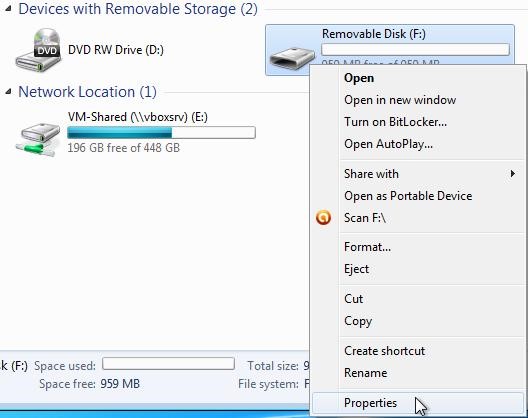
Alternatively, you can open Windows | File Explorer (or use keyboard shortcut: Windows Key + E), right-click the newly discovered removable drive and select Properties from the menu. Select the ReadyBoost tab from the Properties dialog box that appears.

If Windows states that “This device cannot be used for ReadyBoost – The device does not have the required performance characteristics for use in speeding up your system“, follow the instructions of Reformatting Your Digital Care ReadyBoost Disc below. And then come back to this step.

If Windows states that “ReadyBoost is not enabled because this computer is fast enough that ReadyBoost is unlikely to provide additional benefit“, this probably means that Windows is installed on an SSD and no performance gain is possible. Please contact our support team (support@paretologic.com) for further options of how to speed up your PC.


Step 3. If ReadyBoost options appear, you can use the device for speeding up Windows Vista, 7, 8/8.1 or 10.

In Windows Vista, enable the Use this device option and move the Space to reserve for system speed slider all the way to the right.

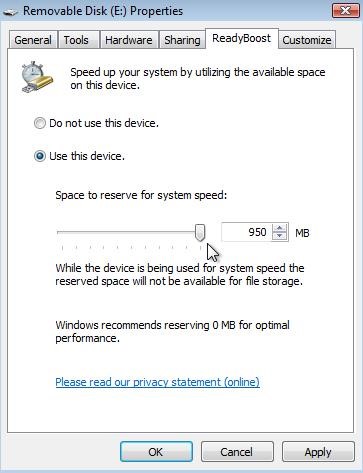
In Windows 7, 8, 8.1 and 10, select the Dedicate this device to ReadyBoost option.

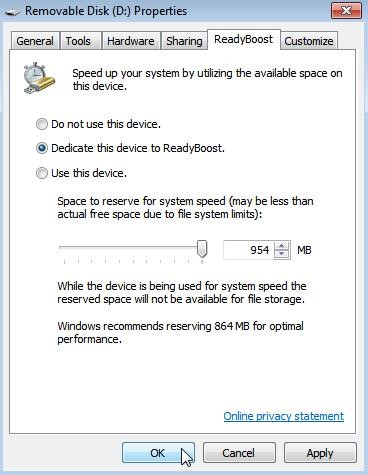
Click OK and your Digital Care ReadyBoost Disc device is ready!

Reformatting Your Digital Care ReadyBoost Disc

Occasionally, your Digital Care ReadyBoost Disc requires initial reformatting prior being used. Follow the steps below to format your drive.

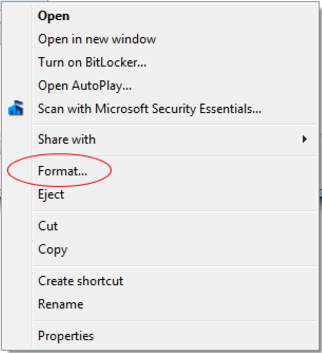
Step 1. Open Windows | File Explorer (or use keyboard shortcut: Windows Key + E), right-click the newly discovered removable drive and select Format.

Step 2. In File system dropdown menu, choose NTFS. In Allocation unit size, choose Default allocation size. And check Quick Format under Format options. Click Start.

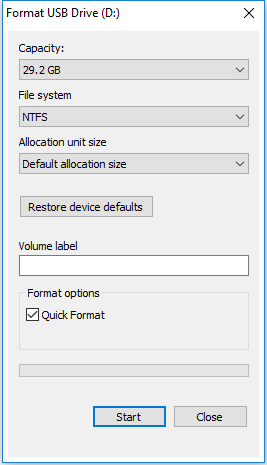
You will be notified once your Digital Care ReadyBoost Disc has been formatted and ready for being used. Simply follow the steps in the previous section to finish setting up your Digital Care ReadyBoost Disc.

Need Support or Help?

Email us at support@compuclever.com for more information and get help with using your Digital Care ReadyBoost Disc device.

Filed Under: computer fixes, improving performance, increasing speed, PC hardware, PC TuneUp Maestro, ReadyBoost, Windows 10, Windows 7, Windows 8, Windows tips Tagged With: PC Speed, ReadyBoost, User Guide

FAQ – Digital Care ReadyBoost USB Disc

July 7, 2017 by Andy Thompson

 
Q: What is ReadyBoost and how does it help my PC speed?

A: ReadyBoost is a Microsoft Windows technology that allows you to use ReadyBoost compatible USB flash drive, such as Digital Care ReadyBoost USB Disc, as an additional memory. Doing so, ReadyBoost improves your system’s performance by providing quicker access to data compared to accessing the information from the hard drive. To learn more about the ReadyBoost technology, please read this blog post.


Q: What’s the System Requirement for Digital Care ReadyBoost USB Disc?

A: Digital Care ReadyBoost USB Disc supports Windows Vista, Windows 7, Windows 8/8.1, and Windows 10


Q: Do all USB flash drives support the ReadyBoost technology?

A: No. A USB flash drive must meet the minimum random ready and write speeds requirements to support the ReadyBoost feature.  In order for ReadyBoost to work, it requires a USB storage device to have at least: 64MB, USB 2.0, read at 3.5 MB/s, and write at 2.5 MB/s. Our Digital Care ReadyBoost USB Disc well exceeds this requirements.


Q: Aren’t Hard Disks faster than flash? My HDD has 80MB/sec throughput.
A: Hard drives are great for large sequential I/O. For those situations, ReadyBoost gets out of the way. We concentrate on improving the performance of small, random I/Os, like paging to and from disk.


Q: What’s the recommended capacity for a USB flash drive for ReadyBoost?

A: We recommend a 1:1 ratio of flash to system memory at the low end and as high as 3:1 flash to system memory. So if your existing PC has a 4 GB of RAM, then you should choose a 4 GB USB flash drive for ReadyBoost, or consider an 8 GB or 12 GB USB flash drive if possible.


Q: I encounter the message: “This device cannot be used for ReadyBoost – The device does not have the required performance characteristics for use in speeding up your system”. What should I do?

A: Your Digital Care ReadyBoost USB Disc is fully compatible for Microsoft ReadyBoost technology. When you encounter this message, you simply need to format your USB flash drive.

To do so, open Windows | File Explorer (or use keyboard shortcut: Windows Key + E), right-click the newly discovered removable drive and select Format…

In File system dropdown menu, choose NTFS. In Allocation unit size, choose Default allocation size. And check Quick Format under Format options. Click Start.

Once the formatting is completed, your Digital Care ReadyBoost USB Disc is ready to be used.


Q: What does it mean if Windows states that “ReadyBoost is not enabled because this computer is fast enough that ReadyBoost is unlikely to provide additional benefit“?

A: This probably means that your Windows operating systems is installed on an SSD and no performance gain is possible. This is only true in theory because each PC is different. If you feel that your PC is sluggish and requires optimization, please contact our support team (support@CompuClever.com) for further options of how to speed up your PC.


Q: What happens when you remove the drive?
A: When a surprise remove event occurs and we can’t find the drive, Windows fall back to disk. Again, all pages on the device are backed by a page on disk. No exceptions. This isn’t a separate page file store, but rather a cache to speed up access to frequently used data. So no data loss will occur.


Q: Won’t ReadyBoost wear out the drive?
A: Nope. ReadyBoost technology is designed to take care of the lifecycle issues with flash drives and are smart about how and when it performs writes to the device. Relevant third party tests show that you will get at least 10+ years out of flash devices by using the ReadyBoost technology.


Q: How secure is ReadyBoost?

A: ReadyBoost is secure. ReadyBoost by default uses Advanced Encryption Standard 128 (AES-128) encryption, which should be sufficient as the chances of exposing sensitive data are very slim.


Q: What alternatives are there to ReadyBoost?

A: Two alternatives that will significantly improve performance over ReadyBoost are:

  • Using a Solid State Drive (SSD) for your Operating System drive.
  • Adding additional memory (RAM) to your computer.

Nevertheless, neither alternatives are cheap or easy to perform, as compared to using the ReadyBoost option.

Filed Under: improving performance, increasing speed, PC hardware, ReadyBoost, Windows 10, Windows 7, Windows 8, Windows tips Tagged With: PC Speed, ReadyBoost, TuneUp, USB Flash Drive

Speed up Your PC with ReadyBoost

March 2, 2017 by Andy Thompson

All PC users have likely experienced the frustration related to slow performance.  There’s something just not right about having to wait for your PC to switch from one application to another.  We want to multi-task and we want a PC system that does not suffer any delays.  And, we ask, why not?  It’s an extension of what we are capable of.  So what are the choices in dealing with slow performing systems?  We can keep our original PC just as it is with very few applications (not taking full advantage of its capabilities and not much fun).  We can live with frustration and wait for the PC to respond when it is slow.  We can look at the costs associated with adding more RAM or increasing other hardware.  Instead of these options, we suggest a fast, easy, free alternative offered by Microsoft called ReadyBoost.

In our previous article we provided information about USB technology including USB flash drives.  With that information in hand you are ready to speed up your PC with ReadyBoost.  Let’s start with an overview of the technology.

Who Will Benefit?

Using this technology is best for users with 8 GB of RAM or lower, using a traditional spinning platter hard drive (HDD), and an operating system of Windows Vista or higher.

How to determine how much RAM you have:
Do one of the following:

  1. Open up your Computer window (Windows / File Explorer), locate: Computer (or “This PC”), right-click and select Properties.
  2. Open up the Control Panel and select: System and Security and in the “System” section select View amount of RAM and processor speed.

In the window that appears you can now view the specific operating system, the amount of physical memory (RAM), and other system information.

ReadyBoost will have little performance improvement or will be irrelevant if:

  • You already have a lot of RAM (> 16 GB) on your system
  • You are using a SSD drive.

The Technology:

From the many articles we have passed on to you in the past, you likely have a good idea that CompuClever programs such as PC TuneUp Maestro and PC Clean Maestro can regain performance that has been lost due to: defragmentation; clutter of junk files and unwanted applications (leading to the reduction of available space).  These tools can also assist you when faced with a bogged down Internet connectivity as well as using functions related to improving browser speed and startup speed.

Now we can shine some light on a technology that can take your PC as it is, and can extend its performance abilities.  Keep in mind we still recommend that you enhance your performance through regular clean up and maintenance.

The basics of the technology involve being able to cache data to a device.  In this case, the device is a USB flash drive.  You can also use CompactFlash and SD cards.  How it works is that data is temporarily stored on the flash drive so that it can be retrieved faster than using the internal hard drive and available memory (RAM or “Random Access Memory”).  Flash memory, such as a USB drive or SSD (Solid State Drive), benefit from faster seek times than standard magnetic hard disk drives.  The only limitation is that USB flash drives will wear out in time.  By some estimates[1] this won’t be for approximately 10 years.

Here’s How To:

You can begin by using a USB flash card that has at least 1 gigabyte (GB) of available space.  For best results, use a flash drive or flash memory card with at least double the amount of available space as the amount of memory (RAM) in your computer.[2]

Flash memory card specifications:

  • You can use a maximum of 32 GB of available space on any single removable storage device.
  • The USB flash drive must support USB 2.0 or higher and your computer must have at least one free USB 2.0 port to plug in the drive.  Note: ReadyBoost works best if you plug the flash drive into a USB port directly rather than an external USB hub shared with other USB devices.
  • Most memory cards work with ReadyBoost.  Different kinds of flash memory cards include CompactFlash and Secure Digital (SD).  Note: Some SD memory cards don’t work well with ReadyBoost due to issues with the SD card interface.  ReadyBoost displays a warning message in these cases.

To enable or disable ReadyBoost:

  1. Plug a USB flash drive or flash memory card into an available port.
  2. The Autoplay dialog box appears.  Under the General options, you can click Speed up my system.
  3. The Properties dialog box opens.  Note: You can also access this dialog any time by opening the Computer window (Windows / File Explorer), right-clicking the drive, and selecting Properties.Next, click the tab: ReadyBoost.You can then do one of the following (as seen in the image here):
    • To turn ReadyBoost off, click: Do not use this device.
    • To use the maximum available space, click: Dedicate this device to ReadyBoost.  Windows will leave any files already stored on the device, but it’ll use the rest of the space to enhance system performance.
    • To use less than the maximum available space on the device, click Use this device, and then move the slider to choose the amount of available space on the device you want to use.
  4. Click OK.

Windows displays the recommended space to use for optimal performance.  If there isn’t enough space for ReadyBoost, a message is displayed telling you to free some space on the device.

The Benefits:

Our CompuClever team members have used ReadyBoost on a few systems that were so slow we faced having to replace them.  We noted significant gains in performance of these computers.  For systems that have only 2 or 4 GBs of RAM, the performance gains are significant.

We researched test results for ReadyBoost and found a very good site.  Here is a list of improvements as well as situations where there are no performance gains.

When enabling ReadyBoost on a system with low amounts of RAM, you can experience:

  • Opening media files like photos, music or video is slightly faster (approximately by 2%).
  • The loading of web pages and the use of Office applications is slightly faster (approximately by 2%).
  • Your system’s boot timings are improved (up to 7%).
  • Your most used applications start faster (by 10 to 15%).

This same site states:

You will not notice any difference with ReadyBoost enabled when you play games or you run applications that are CPU or GPU intensive.  Also the improvements get smaller when you add more RAM.  On a system with more than 4GB of RAM you will not notice anything getting better.  Also, adding an SSD drive to your computer means that there is no point in using ReadyBoost.  We’ve done some very quick tests after adding an SSD and we quickly noticed that ReadyBoost becomes irrelevant.

Ejecting Flash Drives:

It is good practice to eject flash drives that are in use.  This means closing windows and applications using the device and then using the Safely Remove Hardware icon.  In doing so, you eliminate the risk of losing data or experiencing data corruption – especially when files are being transferred.

To properly eject a drive:
Use the Safely Remove Hardware icon and eject your device before pulling it out of the USB port.
You can also locate the drive in the Computer window (Windows / File Explorer) right-click it, and select Eject.  Windows will tell you when it’s safe to remove the device thereby eliminating any chances of data corruption.

The exception:

In our research we found that:

Microsoft does not require ReadyBoost devices to be ejected before being removed. The ReadyBoost files are simply a cache for the real files being written to disk and removing the drive without ejecting does not harm the system.[3]

In fact, you can leave your ReadyBoost enabled drive inserted in the port and shutdown your system.  In this way, when you start up your PC you can also enhance startup time performance.

Summary:

There are few disadvantages to this free technology.  You need to dedicate a USB port for your drive (using a USB hub is possible but not preferred).  Also, your flash drive will eventually need to be replaced… but before that happens you’ll likely have purchased a new system entirely.  Cost is not really a factor though.  Flash memory drives are fairly inexpensive and certainly not as much as installing new hardware or buying a new system altogether.

Given all this, we strongly feel that ReadyBoost can extend the life of older PCs that are lacking the necessary RAM and are not able to keep up in a fast computing world.  We hope you enjoy the benefits as we have.

We will continue to provide story lines like this that benefit all of us and we will describe them in a manner that is within reach of everyday computer users.  If you have some ideas of topics you would like us to cover, email us at: newsletter@compuclever.com


[1] https://en.wikipedia.org/wiki/ReadyBoost
[2] http://windows.microsoft.com
[3] http://www.howtogeek.com/

Filed Under: computer fixes, improving performance, increasing speed, Newsletter, PC hardware, Uncategorized, Windows tips Tagged With: ReadyBoost, Speed, USB

Why You Should Always Backup Locally—Even if You Use Cloud Storage

September 9, 2016 by Charles Edward

Thanks to smartphones, video cameras and other gadgets we all create a massive amount of files. Often our computer hard drives are too small to store all of this information. Luckily, there are free remote backup services such as Dropbox and Google Drive that can automatically upload our files remotely.

The biggest problem with saving remotely on cloud services such as Google Drive and Dropbox is you could be hacked. Even Apple’s iCloud service, with some of the toughest security in the world, has been hacked.

So, it’s always a good idea to backup locally first before relying on remote backup. USB or “thumb” drives are handy devices that in many ways can be the perfect solution for local backups.

Reliable and cheap, USB drives can store anything from 1GB (the size of a feature-length HD movie) to 1TB (1000 feature-length movies) of data. Unlike a powered HDD backup drive, USB drives are also portable and easier to keep safe.

How Many Files Can Be Stored on a USB Drive?

If you’re backing up images from your camera and want to know how many will fit on a USB thumb drive all you really need is to know is the size of the image, which is measured in megapixels. Use the table below to find the size of the megapixels along the left, and then the size of storage in the USB key across the top:

how many files can be stored on a usb

So, a 64GB USB key can store over 8,000 high-resolution images—this should be more than enough enough to back up all of the photos you take on a vacation if, say, you have limited access to Internet to make an online backup.

For videos, documents and other files, file sizes range dramatically. To figure out your storage needs you’ll have to look at the sizes of your files or folders in Windows Explorer.

Remember, the larger the file, the longer it will take to transfer from your computer. So it may be worth it to consider USB 3.0, which is the latest and fastest USB standard.

Compared to USB 2.0, USB 3.0 is about 10 times faster and USB 3.1 is about 20 times faster. Along with being faster, USB 3.0 also has the ability to provide power if the device does not have a power connection of its own.

Speed Up An Older Computer With a USB Drive

Besides performing backups and safeguarding your data, USB drives can speed up your computer. This technique is super effective for older computers that typically have smaller amounts of RAM—2GB, for example. RAM is the “secret ingredient” to making your computer run fast, and if you don’t have a lot of RAM, using a computer can be a frustrating experience.

A USB drive can help with that. Using a technology called ReadyBoost, you can plug a USB into your computer and get a performance upgrade. Read more about it here.

Try Out a USB 3.0 Kingston DataTraveler—On Sale Now!

If you’re interested in trying out USB 3.0 for yourself, the Kingston Digital DataTraveler USB 3.0 flash memory drives are on sale right now on our newly launched hardware site CompuCleverGear.com.

Since the Kingston USB flash memory drives uses USB 3.0 technology it's a great way to not only speed up your backup process but also to future-proof your saved files.

Filed Under: Blog, Gears and Gadgets, improving performance, increasing speed Tagged With: backup, ReadyBoost, USB 3.0, USB Flash Drive

Don't miss out

Get a copy of "5 Tips for a Fast PC" when you sign up for our free "PC Tips" newsletter.

Subscribe Now
Archive Newsletter

Recent Posts

  • Ultra File Opener 5.7 Release Note

    Ultra File Opener 5.7 Release Note

    July 24, 2018
  • How Blue Light Affects Your Health and What to Do About It

    How Blue Light Affects Your Health and What to Do About It

    May 11, 2018
  • How to Protect Your Privacy & Identity on Facebook – Part 2

    How to Protect Your Privacy & Identity on Facebook – Part 2

    April 18, 2018
  • Facing the Truth – Facebook & Privacy

    Facing the Truth – Facebook & Privacy

    April 7, 2018
  • Spectre and Meltdown:  Massive Security Holes Impacting All Mac and PC devices

    Spectre and Meltdown: Massive Security Holes Impacting All Mac and PC devices

    January 12, 2018
  • How to Fix Computer Sound Problems

    How to Fix Computer Sound Problems

    December 19, 2017
  • Correct Ergonomics Sitting at a Computer Desk

    Correct Ergonomics Sitting at a Computer Desk

    November 17, 2017
  • Five Useful Tips and Tricks for Windows 10

    Five Useful Tips and Tricks for Windows 10

    August 27, 2017
  • Going Incognito – Browse Web in Privacy Mode

    Going Incognito – Browse Web in Privacy Mode

    August 4, 2017
  • Don’t be Held at Ransomeware

    Don’t be Held at Ransomeware

    July 14, 2017
Contact Us | Privacy Statement | Terms of Use | EULA | Partner With Us | Uninstall | Blog
CompuClever© Systems Inc. 2023 All rights reserved.
Microsoft is a trademark of the Microsoft group of companies. All other trademarks are the property of their respective owners.