• Home
  • Products
  • Purchase
  • Support
  • Company

CompuClever Blog

A Quick Start Guide for Digital Care ReadyBoost USB Disc

July 10, 2017 by Andy Thompson


Thanks for choosing Digital Care ReadyBoost Disc, featuring Microsoft ReadyBoost technology. Before you start, please save all your documents and exit all running applications. Follow the steps below to install your Digital Care ReadyBoost Disc and optimize your PC.

Step 1. Insert the Digital Care ReadyBoost Disc to a USB slot of your choice.

Step 2. If AutoPlay/AutoRun is enabled, you can click the Speed up my system using Windows ReadyBoost option.
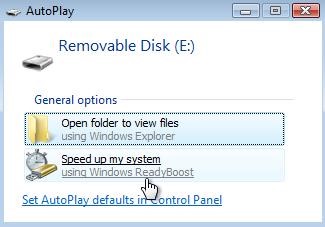
Alternatively, you can open Windows | File Explorer (or use keyboard shortcut: Windows Key + E), right-click the newly discovered removable drive and select Properties from the menu. Select the ReadyBoost tab from the Properties dialog box that appears.

If Windows states that “This device cannot be used for ReadyBoost – The device does not have the required performance characteristics for use in speeding up your system“, follow the instructions of Reformatting Your Digital Care ReadyBoost Disc below. And then come back to this step.

If Windows states that “ReadyBoost is not enabled because this computer is fast enough that ReadyBoost is unlikely to provide additional benefit“, this probably means that Windows is installed on an SSD and no performance gain is possible. Please contact our support team (support@paretologic.com) for further options of how to speed up your PC.
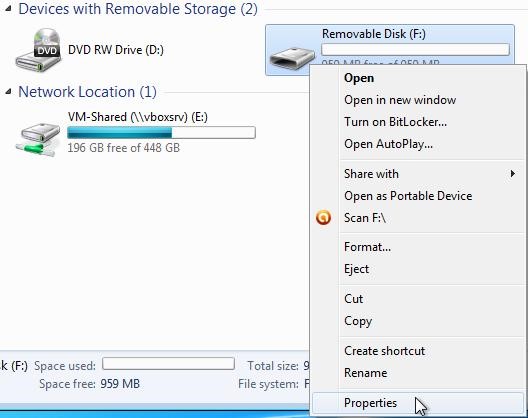
 

Step 3. If ReadyBoost options appear, you can use the device for speeding up Windows Vista, 7, 8/8.1 or 10.

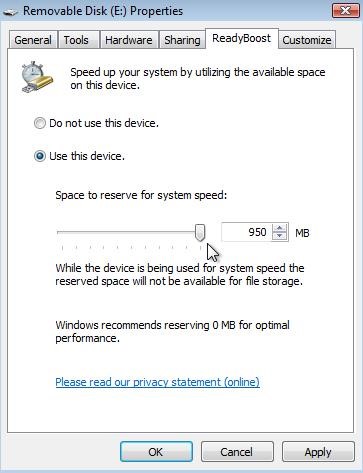
In Windows Vista, enable the Use this device option and move the Space to reserve for system speed slider all the way to the right.
In Windows 7, 8, 8.1 and 10, select the Dedicate this device to ReadyBoost option.
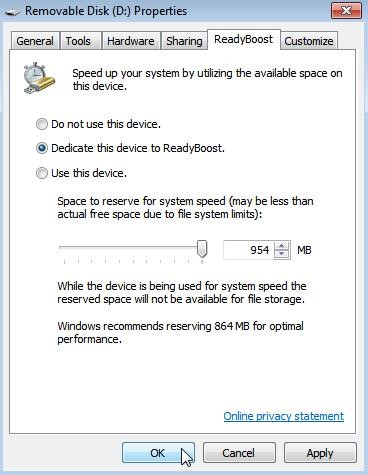
Click OK and your Digital Care ReadyBoost Disc device is ready!

Reformatting Your Digital Care ReadyBoost Disc

Occasionally, your Digital Care ReadyBoost Disc requires initial reformatting prior being used. Follow the steps below to format your drive.

Step 1. Open Windows | File Explorer (or use keyboard shortcut: Windows Key + E), right-click the newly discovered removable drive and select Format.
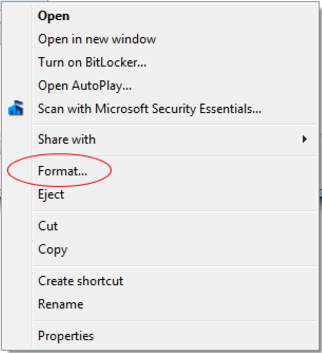
Step 2. In File system dropdown menu, choose NTFS. In Allocation unit size, choose Default allocation size. And check Quick Format under Format options. Click Start.
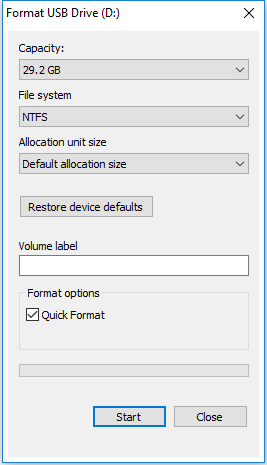
You will be notified once your Digital Care ReadyBoost Disc has been formatted and ready for being used. Simply follow the steps in the previous section to finish setting up your Digital Care ReadyBoost Disc.

Need Support or Help?

Email us at support@compuclever.com for more information and get help with using your Digital Care ReadyBoost Disc device.

Filed Under: computer fixes, improving performance, increasing speed, PC hardware, PC TuneUp Maestro, ReadyBoost, Windows 10, Windows 7, Windows 8, Windows tips Tagged With: PC Speed, ReadyBoost, User Guide

FAQ – Digital Care ReadyBoost USB Disc

July 7, 2017 by Andy Thompson

 
Q: What is ReadyBoost and how does it help my PC speed?

A: ReadyBoost is a Microsoft Windows technology that allows you to use ReadyBoost compatible USB flash drive, such as Digital Care ReadyBoost USB Disc, as an additional memory. Doing so, ReadyBoost improves your system’s performance by providing quicker access to data compared to accessing the information from the hard drive. To learn more about the ReadyBoost technology, please read this blog post.


Q: What’s the System Requirement for Digital Care ReadyBoost USB Disc?

A: Digital Care ReadyBoost USB Disc supports Windows Vista, Windows 7, Windows 8/8.1, and Windows 10


Q: Do all USB flash drives support the ReadyBoost technology?

A: No. A USB flash drive must meet the minimum random ready and write speeds requirements to support the ReadyBoost feature.  In order for ReadyBoost to work, it requires a USB storage device to have at least: 64MB, USB 2.0, read at 3.5 MB/s, and write at 2.5 MB/s. Our Digital Care ReadyBoost USB Disc well exceeds this requirements.


Q: Aren’t Hard Disks faster than flash? My HDD has 80MB/sec throughput.
A: Hard drives are great for large sequential I/O. For those situations, ReadyBoost gets out of the way. We concentrate on improving the performance of small, random I/Os, like paging to and from disk.


Q: What’s the recommended capacity for a USB flash drive for ReadyBoost?

A: We recommend a 1:1 ratio of flash to system memory at the low end and as high as 3:1 flash to system memory. So if your existing PC has a 4 GB of RAM, then you should choose a 4 GB USB flash drive for ReadyBoost, or consider an 8 GB or 12 GB USB flash drive if possible.


Q: I encounter the message: “This device cannot be used for ReadyBoost – The device does not have the required performance characteristics for use in speeding up your system”. What should I do?

A: Your Digital Care ReadyBoost USB Disc is fully compatible for Microsoft ReadyBoost technology. When you encounter this message, you simply need to format your USB flash drive.

To do so, open Windows | File Explorer (or use keyboard shortcut: Windows Key + E), right-click the newly discovered removable drive and select Format…

In File system dropdown menu, choose NTFS. In Allocation unit size, choose Default allocation size. And check Quick Format under Format options. Click Start.

Once the formatting is completed, your Digital Care ReadyBoost USB Disc is ready to be used.


Q: What does it mean if Windows states that “ReadyBoost is not enabled because this computer is fast enough that ReadyBoost is unlikely to provide additional benefit“?

A: This probably means that your Windows operating systems is installed on an SSD and no performance gain is possible. This is only true in theory because each PC is different. If you feel that your PC is sluggish and requires optimization, please contact our support team (support@CompuClever.com) for further options of how to speed up your PC.


Q: What happens when you remove the drive?
A: When a surprise remove event occurs and we can’t find the drive, Windows fall back to disk. Again, all pages on the device are backed by a page on disk. No exceptions. This isn’t a separate page file store, but rather a cache to speed up access to frequently used data. So no data loss will occur.


Q: Won’t ReadyBoost wear out the drive?
A: Nope. ReadyBoost technology is designed to take care of the lifecycle issues with flash drives and are smart about how and when it performs writes to the device. Relevant third party tests show that you will get at least 10+ years out of flash devices by using the ReadyBoost technology.


Q: How secure is ReadyBoost?

A: ReadyBoost is secure. ReadyBoost by default uses Advanced Encryption Standard 128 (AES-128) encryption, which should be sufficient as the chances of exposing sensitive data are very slim.


Q: What alternatives are there to ReadyBoost?

A: Two alternatives that will significantly improve performance over ReadyBoost are:

  • Using a Solid State Drive (SSD) for your Operating System drive.
  • Adding additional memory (RAM) to your computer.

Nevertheless, neither alternatives are cheap or easy to perform, as compared to using the ReadyBoost option.

Filed Under: improving performance, increasing speed, PC hardware, ReadyBoost, Windows 10, Windows 7, Windows 8, Windows tips Tagged With: PC Speed, ReadyBoost, TuneUp, USB Flash Drive

What Is a VPN, and Why Do You Need One?

April 28, 2017 by Charles Edward

In March 2017, the US Congress voted to allow internet service providers (ISPs) to sell customer data. Anyone in the United States who connects to the Internet must rely on an ISP. This means your ISP now has knowledge of all of your browsing habits.

While ISPs claim they will use your Internet history to help sell you more relevant ads, the decision by Congress has made many people deeply uncomfortable.

WiFi Hotspots Are Also A Risk?

It’s not just ISPs who are after your browsing data and personal information. For example, whenever you login to a WiFi hotspot in a coffee shop or at the airport you are potentially putting yourself at risk. WiFi hotspots may not protect your data as it is transmitted to and from your device. Even worse, some WiFi hotspots may want to steal your data, such as browsing history or even passwords and credit card information.

Luckily, something called a virtual private network (VPN) may help protect you from ISPs and anyone else who wants to snoop on your Internet habits.

What Is a VPN?

A VPN is essentially an online service that allows you to create a secure Internet connection. All of your browsing is encrypted, meaning that no one, including your ISP or even the government can determine what you are doing on the Internet.

How Does It Work?

When you connect to a VPN, you usually launch a VPN client on your computer (or click a link on a special website), log in with your credentials, and your computer exchanges trusted keys with a far away server. Once both computers have verified each other as authentic, all of your internet communication is encrypted and secured from eavesdropping.

There are two main advantages to using a VPN:

Advantage #1: Browse Privately and Safely

As mentioned, all of your browsing information is encrypted. This means that your ISP cannot sell your data to a third-party for advertising. VPNs also ensure that your passwords and banking information are kept safe, too.

For example, many journalists and businesspeople traveling abroad use VPNs to protect their privacy.

Advantage #2: Browse Everywhere

Businesspeople and journalists may also use VPNs just to be able to communicate. For example, the Great Firewall of China prevents Internet users from accessing many useful websites from outside of China. Many people rely on VPNs to access indispensable online services for their jobs.

On the other hand, VPNs are also useful because they allow you to browse as though you were in any country. Many online content providers such as Netflix, Hulu and the BBC restrict access to content based on your country. You can use a VPN to get around these rules.

What to Look For In a VPN

Not all VPNs are created equally, so it’s important to look for the right one before making a choice.

Look for:

Speed

If you want to use a VPN in order to watch online content such as Netflix, make sure it has enough bandwidth to do so. Generally speaking, this bandwidth is a result of investments in server capacity and other technology. Some VPNs have more than others.

Your Data Must Be Kept Safe

Almost anyone with a little technical know-how can setup a VPN service and then sell it to consumers. The problem for you is: how do you know they’re going to protect your data?

Look for a VPN with a professional website and an active and responsive social media presence. And, if you’re really concerned with privacy, look for a VPN that has its servers in a country with strong data privacy laws. In countries such as the United States and the United Kingdom, government now has broad powers to access your data.

Countries such as Canada, Germany and Switzerland have much stronger rules prohibiting government collection of personal data, so look for a VPN headquartered in one of those countries first.

When Can a VPN Not Protect Your Privacy?

Even if a VPN does not share your personal information, there are others who can. For example, Google and Facebook both use your profile data, which includes browsing history, to sell advertising. A VPN is not designed to prevent this from happening–protecting yourself from Facebook and Google’s efforts to collect data is best done using browser-based ad blocking tools.

Also, keep in mind that you typically choose to use Google and Facebook because you agree to trade some privacy for the convenience of their services.

However, since you pay ISPs directly, you should expect that your privacy be respected. But since ISPs and others are not respecting your privacy, it may be a good time to use a VPN.

What We Recommend: SecureVPN

SecureVPN allows you to surf the web anonymously, unlock websites, unlock VoIP services, secure any wifi hotspot, and protect your data & privacy.

SecureVPN operates a self-managed VPN network with at least 750 servers in 141 countries, with plans to add more.

Since there are so many local servers, this means SecureVPN promises the fastest speed possible. SecureVPN also owns its own network–there are no third-parties that gather data, and SecureVPN keeps no logs of your activities.

Why choosing SecureVPN?

SecureVPN offers a variety of features, including:

  • No 3rd Parties for Your Data: SecureVPN has a self-managed network. Your data is handled by SecureVPN only, without the intervention or interference of any third-parties.
  • Military-grade Encryption: SecureVPN employs top-of-the-line military-grade up to 256-bit encryption to protect and safeguard user’s data from falling into the wrong hands.
  • 750+ Servers in 141 Countries: SecureVPN has servers in 141 Countries. So, no matter where you are or where you travel to, SecureVPN will connect you to your favorite content.
  • 99.99% Uptime: SecureVPN has its own network of servers and a team of highly professional experts who manage and host the network to guarantee 99.9% uptime.
  • Powerful Software and Apps: SecureVPN wrote its own code for its proprietary software and apps for every major platform including Windows, Mac, iOS, Android, and Linux.
  • Unlimited Data Transfer: Download, browse, stream or share, SecureVPN users are free to do whatever they want, how much they want since there is no bandwidth or data limit.


Filed Under: Blog, online security, PC security Tagged With: online safety, privacy, vpn

Five More Useful Tips and Tricks for Windows 10

April 6, 2017 by Charles Edward

Windows 10 is an amazing and powerful operating system that offers plenty of features most people don’t know about. We want you to get the most out of your computing experience!  To this end we recently provided tips and tricks for Windows 10.  We now include five more tips and tricks so you can take greater advantage of the latest Windows OS.

1. Establish Restore Points

You can think of a “restore point” as a snapshot of the operating system settings at a given point in time.  Windows has the ability to automatically create a restore point before major changes are made to your computer. For example, when you get the latest automatic Windows update your system settings can change.

Be aware, there are situations that arise where modifications, such as PC updates, can cause problems. You can feel safe in knowing that you have the option to rollback your system settings to any restore point. Windows 7 created restore points for your system by default – Windows 10 in some cases is not active. In fact, System Protection may or may not be turned on depending on how you installed Windows 10.

We suggest you follow this easy tip to enable System Protection and have restore points created automatically.

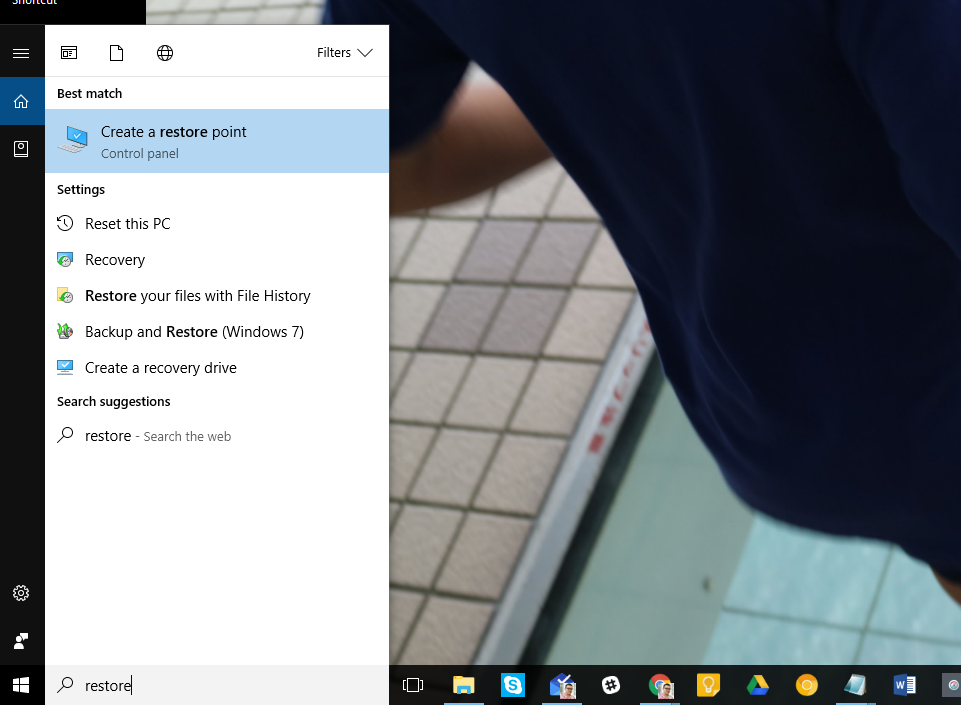
  1. Right-click the Start icon and select “Search”.  From the Cortana search box, type “restore point” and select the “Create a restore point” option as seen here.restore point
  2. In the System Properties dialog that appears, click the “Configure” button and make sure “Turn on system protection” is selected.  Click the “OK” buttons to exit the dialogs and you are done.

2. Schedule Restarts

We find one of the most annoying things about previous versions of Windows was that updates could be downloaded and installed at almost any time – with no warning. For those of us who need our PC running and don’t want to be interrupted with a restart, this was a problem.

Now, with this tip, you can forgo any install updates during a specific window of time each day using the “Active hours” feature. Updates will be downloaded and installed when you’re NOT using your computer.

Here’s how you can make the change:

  1. Click the Windows Start menu, select “Settings”, and then select the “Update & security” option.
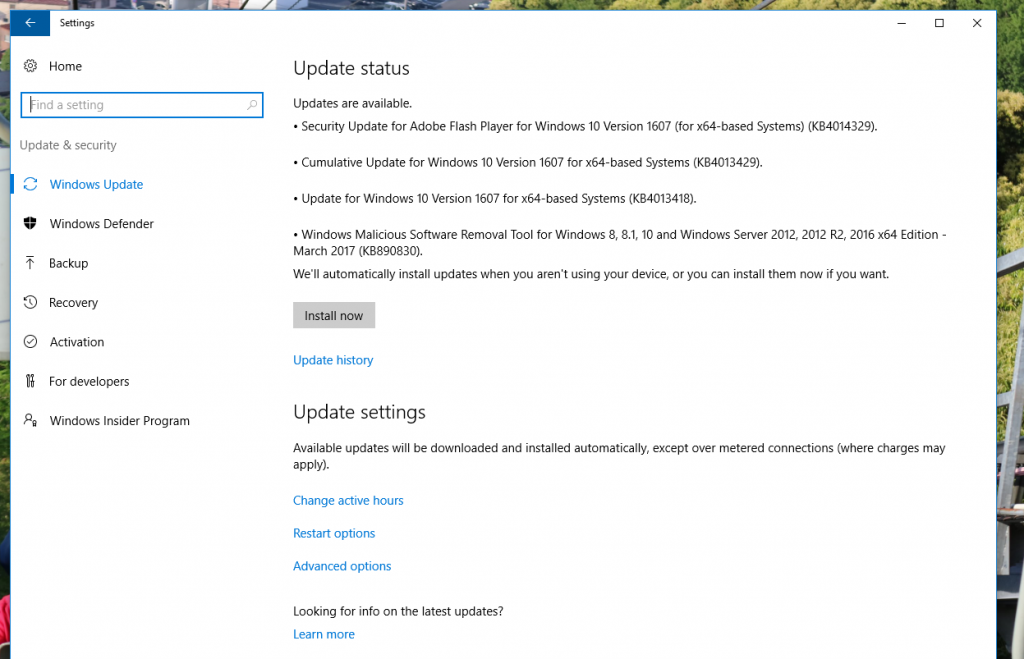
  2. In the left panel, click the “Windows Update” option.change active hours
  3. As seen above, click the “Change active hours” option.
  4. You can adjust the Start time and End time by selecting the hour of your choice and clicking the check mark.  When you are done, click “Save”.

Here are some helpful tips:

  • The start-to-end time window must be between 1 and 12 hours.
  • The same Active hours are applied for every day of the week.

The Windows 10 Active hours dialog states: “We’ll check to see if you are using this device before attempting to restart.”  Keep in mind that in the Settings window you can choose “Restart options” to temporarily override the Active hours and customize a finish time for installing updates.

3. Control Startup Processes

Many Tech experts agree that one of the biggest causes of a slow computer is having too many processes at startup. More specifically, it takes longer for your computer to be ready for use if it has an excessive number of programs to load. However, as with earlier versions of Windows, you can control which programs you want to launch at startup.

In the past, you might have used the MSConfig command. Luckily, Windows 10 provides a more direct path to the Task Manager and make changes to the startup apps.

Manage Startup Processes From Windows 10 Task Manager:

You can begin by launching the Task Manager.  To do this, right-click on the Start button and choose Task Manager from the menu. You can also type in “Task Manager” in the search box.

Once the Task Manager launches, click the “Startup” tab.

how to control startup

This displays a list of everything that can launch when you turn on your machine. We advise to pay special attention to the “Status” column as not everything on the list is actually enabled. If an item it marked as “Disabled” you can ignore it as it will not be part of the startup sequence.

If you see any apps that you don’t want to launch at startup simply right-click on the item and select “Disable”.

NOTE: CompuClever makes it EASY to make alterations to startup programs with the “StartUp Management” tool available in PC TuneUp Maestro!

4. How to Get Started Using Cortana

Many new users find Cortana to be one of the more interesting and advanced features included in Windows 10. Cortana is a voice-activated personal assistant similar to iPhone’s Siri provided by Apple.

You can use Cortana to check the weather, set reminders, send emails, find files, search the Internet, and more. Cortana is an example of the great technological advances that have been done in voice recognition software.  This might be the first time you use voice commands to do many of your regular PC tasks and you may find it easier and more efficient – especially if you want to muslti-task.  You’ll also be getting a more “personal” PC experience.

pasted image 0 (2)

Cortana requires both a working microphone and speakers as well as an Internet connection. As mentioned, it can be voice-activated, but this means you need to allow Windows 10 to use your computer’s microphone to listen-in on your day-to-day activities.  If this is more than you would like – you might want to look into how to turn Cortana on and off or avoid using it altogether.

If you want to get the most out of Cortana, we recommend you check out: 15 things you can do with Cortana as provided by How-To Geek.  You’ll be able to take advantage of Cortana’s ability to quickly come up with answers to calculations and conversions.  You can have Cortana track flights or packages. Or you can just chat or even get Cortina to sing, tell you a story, or a joke!

5. Collapse the Office 2016 Tool Ribbon

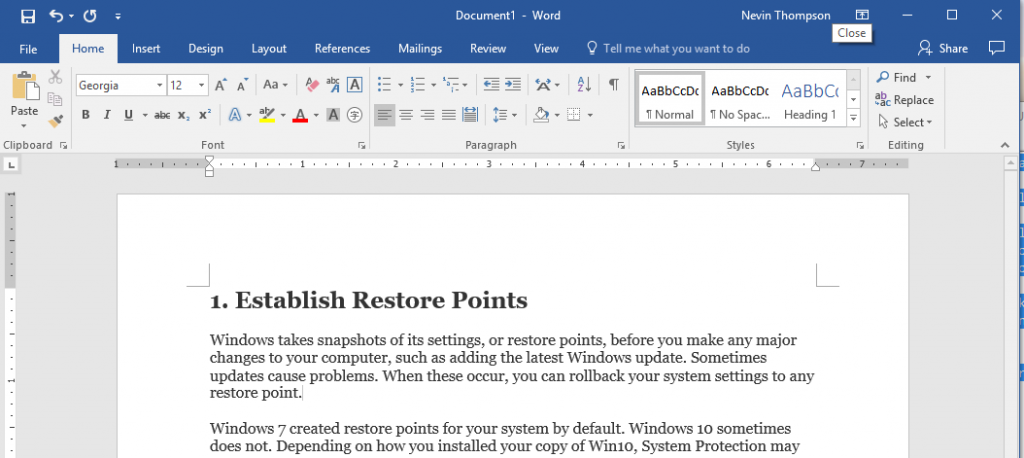
Through the years Microsoft Office has become very comprehensive and powerful. There seems to be a toolbar for almost anything you could ever want to do with a document, spreadsheet or presentation. The problem however, is that on smaller monitors and devices the toolbar ribbons can take over precious screen real estate as can be seen in the image below.

office 2017

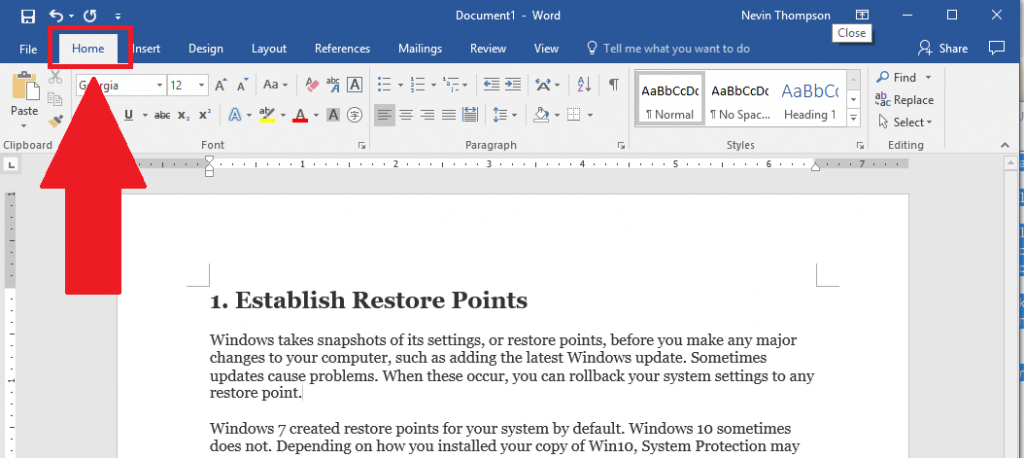
Luckily there is an easy way you can hide the Office ribbon and display it when you need it. To do so, you can simply double-click on the upper tab names, such as “Home”, as seen here:

double click

When you do this the ribbon is hidden. You can display the ribbon once again and pin it in place.  You have to double-click on the name tab once again.

hidden ribbon

That concludes our list of 5 new tips for Windows 10.

More Tips?

Click here to read another 5 Windows 10 tips.

If you have Windows 10 tips you would like to share with us, we would love to hear from you.  Please send an email to us at: newsletter@compuclever.com.

In the meantime, stay tuned for more Windows 10 tips and tricks!

Filed Under: Blog, Windows 10 Tagged With: Cortana, Start up, windows 10

Windows Recovery Disc – Be Prepared Ahead of Time

March 17, 2017 by Charles Edward

Do you have a Recovery Disc for your Windows computer? If you don’t, do you know how to get one? Most people have no idea how to set up a Recovery Disc, which could cause them big headaches if their PC ever develops a problem.

If you have a flaky computer, a Recovery Disc can help by repairing Windows to make things run smoothly again. If you ever encounter a corrupted system file, a Recovery Disc will help you find it and fix it as well. If Windows crashes and you can’t get it to restart, you can also use a Recovery Disc to restore your computer’s operating system.

The best thing is by using a Recovery Disc you’ll be able to save all the data on your computer. This includes Word documents and spreadsheets, your photo collection and your valuable photos and movies.

In short, the Recovery Disc is a lifesaver that provides peace of mind. But, surprisingly, few people have access to one.

Recovery Discs Are Hard to Find

In the past, when you purchased a Windows PC, you likely received a “recovery disc”– an actual compact disc – that you would use to troubleshoot problems and restore Windows on your computer. Over the years these recovery discs can be easy to misplace. If you ever need one in an emergency, they are nowhere to be found.

Microsoft and most PC manufacturers stopped shipping Windows installation disc a few years ago – which is probably better for the environment.

Windows 10 doesn’t come with a Recovery Disc by default – this can be a real problem if you run into trouble with your computer.

Produce a Recovery Disc On Your Own

However there is a step-by-step process you can follow to download and create a Windows Recovery Disc for both Windows 8 and Windows 10, but if you want to protect your Windows 7 computer, you’re basically out of luck. Windows 7 has basically been “retired” by Microsoft, so a Recovery Disc with the full reinstall option is very hard to find online.

But no matter what, the process of producing a Recovery Disc takes some dedicated effort, and can be a real hassle. That’s because, to do it right, you need:

  • A blank USB key that’s at least 4GB in capacity
  • An actual working PC to produce a recovery disc (but what do you do if your PC won’t start?)

On top of that, the actual process of downloading and setting up a full Recovery Disc with the option of reinstalling the Windows OS could take as long as a few hours!

Imagine when you actually need a Recovery Disc, this could be a massive pain… but we have a simple solution.

Choose Your Windows Recovery Disc

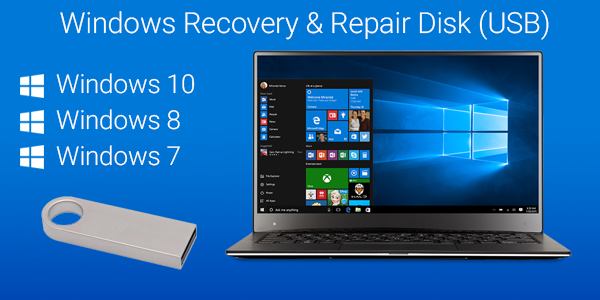
Our CompuCleverGEAR store offers Windows Recovery Disc for Windows 10, Windows 8, and Windows 7 for both 32- and 64-bit versions. Please select the right version for your PC.

Having a Windows Recovery Disc ready by your PC provides you a peace of mind with an emergency plan for both your PC and your important files and data.

Always be prepared and don’t be caught in the rain without an umbrella.

Filed Under: computer fixes, Uncategorized, Windows 10, Windows 8, Windows tips Tagged With: fixing windows, Recovery Drive, windows, Windows 8

  • « Previous Page
  • 1
  • 2
  • 3
  • 4
  • …
  • 30
  • Next Page »

Don't miss out

Get a copy of "5 Tips for a Fast PC" when you sign up for our free "PC Tips" newsletter.

Subscribe Now
Archive Newsletter

Recent Posts

  • Ultra File Opener 5.7 Release Note

    Ultra File Opener 5.7 Release Note

    July 24, 2018
  • How Blue Light Affects Your Health and What to Do About It

    How Blue Light Affects Your Health and What to Do About It

    May 11, 2018
  • How to Protect Your Privacy & Identity on Facebook – Part 2

    How to Protect Your Privacy & Identity on Facebook – Part 2

    April 18, 2018
  • Facing the Truth – Facebook & Privacy

    Facing the Truth – Facebook & Privacy

    April 7, 2018
  • Spectre and Meltdown:  Massive Security Holes Impacting All Mac and PC devices

    Spectre and Meltdown: Massive Security Holes Impacting All Mac and PC devices

    January 12, 2018
  • How to Fix Computer Sound Problems

    How to Fix Computer Sound Problems

    December 19, 2017
  • Correct Ergonomics Sitting at a Computer Desk

    Correct Ergonomics Sitting at a Computer Desk

    November 17, 2017
  • Five Useful Tips and Tricks for Windows 10

    Five Useful Tips and Tricks for Windows 10

    August 27, 2017
  • Going Incognito – Browse Web in Privacy Mode

    Going Incognito – Browse Web in Privacy Mode

    August 4, 2017
  • Don’t be Held at Ransomeware

    Don’t be Held at Ransomeware

    July 14, 2017
Contact Us | Privacy Statement | Terms of Use | EULA | Partner With Us | Uninstall | Blog
CompuClever© Systems Inc. 2023 All rights reserved.
Microsoft is a trademark of the Microsoft group of companies. All other trademarks are the property of their respective owners.