• Home
  • Products
  • Purchase
  • Support
  • Company

CompuClever Blog

Going Incognito – Browse Web in Privacy Mode

August 4, 2017 by Andy Thompson


Incognito, according to Wikipedia, from the Latin incognitus, refers to a person who wants to remain anonymous to the world and others, in hiding or shut off from humanity.

Web surfers have the option to enable privacy mode or “Incognito” mode on their browser.  Each of the main browser type offers some level of private browsing.  It is known as Private Browsing, InPrivate Browsing, and Incognito depending on the type of browser used.

Basically – this is a privacy feature that quite simply provides some privacy on your local computing device but, DOES NOT provide hidden detection or stealth beyond that.  Your ISP (Internet Service Provider) and other agencies connected on the Internet can detect your activities via your unique IP address on the web servers.

Disabling functions such as the web cache and browsing history make this a relatively private way of browsing the web.  Cookies, the data holders sent by web sites to recognize or track your online activity, are also disabled.

Items Deleted or Not Saved:

The list  of items that are deleted or not saved when you browse during Incognito or Privacy  mode are:

  • Website history.
  • The cache of files stored during your browse session.
  • History of files downloaded.
  • Search history stored by the browser.
  • Cookies from browsed sites.
  • Data on forms you have filled out.

Items That Are NOT Private:

There are items that are not deleted and the ways you remain exposed to detection:

  • Search histories stored from search providers like Google are not deleted.
  • Websites can identify you and keep a record of your visit.
  • Your ISP can detect your network traffic and identify your IP address.
  • Any malware on your PC or device can track your activities.

Also, it is important that you keep in mind the browser does not likely perform a secure delete and items from your browsing session can be recovered.  Until that data is overwritten with other data it can be undeleted using special recovery software.

Pros and Cons?

So why would you want to use Incognito?  It doesn’t seem entirely private after all.

Pros

The reasons for using this more of browsing include:

  1. Reducing the history, browsing, and personal data stored on your PC or device.
  2. You can prevent storage of sensitive data such as log-in credentials.
  3. You can also use multiple accounts simultaneously using several tabs at once.
    Tip: You can let a friend check their email or log onto Facebook without you having to log out.  Just start up a new Incognito window.
  4. You can perform searches that are not influenced by any prior browsing history.
  5. Browser extensions are disabled so that Facebook and Google and other services can’t track you.

One of the main reasons however is to hide your online interactions on the computing device you are using from those sharing the same device.

In a busy household full of people… using Incognito mode can prevent others from seeing potentially embarrassing items.  It also prevents others from revealing your search history or the cache of browsed files.

Cons

We’ll, conversely, you may want to monitor online activities on your PC or device.  You may be concerned that someone will incur a malware infection or that they are browsing to websites that could be considered risky, unethical, or harmful. This is when you would want to disable Privacy / Incognito functionality as described below.

Also, having a false sense of protection can lead to consequences.  ISPs pass data to copyright holders (such as music, videos, books, or games), who are cracking down on the downloading of copyright materials.  The ISP is required to forward notices from the copyright holder alleging infringement of that work.

And, as we have pointed out, you are not completely stealthy.

How to Go Incognito

So now that you have a better idea of what the limits and benefits of this mode of browsing are, you can follow the easy steps outlined below to activate it.  Of course it will depend on which browser you are using.

  • Chrome: Click on the ellipsis menu (…) at the right end of the menu bar, and select: “New Incognito Window”.
  • Firefox: Click on the icon with three horizontal lines near the top right corner of the browser, and select: “New Private Window”.
  • Internet Explorer: To change to an “InPrivate” session in Internet Explorer you would hold down Ctrl+Shift and press P (Ctrl+Shift+P).
  • Microsoft Edge: Click the button with three dots (…), called the “More” button, and select: “New InPrivate Windows”.

Disabling It

As we mentioned above, you may want to disable this function so that you can detect for yourself the online activities of others in your household. Click the links below to take you to the specific directions for your browser type.

  • Chrome
  • IE / Firefox / and a freeware tool for Chrome
  • Microsoft Edge

Warning: most of these procedures require a change to the registry.  We recommend you do a backup beforehand and proceed with caution.

For Parents:

If you’re a parent worried about your kids and their private online activities (for example, pornography or social networking sites), then you can first try to disable the functionality as mentioned above.  That way you can check the search and browsing history items.

You can also take the next step and look at filtering software such as NetNanny that will block porn and whatever else you want to filter even when the browser is in Incognito mode.  They have it for computers and mobile devices.  It’s not free but could be worth the peace of mind.

Last Note

We’re in favor of providing information that in the right hands is used with good intent.  To reach a higher level of stealth you would need to look at using a VPN solution.  A VPN masks your physical location and IP address so the website you’re visiting doesn’t really know who or where you are.

We hope this information has been of help to you and enhances your web browsing experiences.  For more information on this topic see our past posts:

  • Privacy – Don’t Give It Away
  • What Is a VPN, and Why Do You Need One?

Feel free to contact us with any questions or comments on this and other subjects.  Simply send us an email at: newsletter@compuclever.com

Filed Under: Blog, online security, PC security, Protect online privacy, Windows tips Tagged With: Firefox, Icognito mode, microsoft edge, privacy mode, vpn

Don’t be Held at Ransomeware

July 14, 2017 by Andy Thompson


With two prominent malware attacks occurring back-to-back during the past two months, you’re likely familiar with the term  – “Ransomware” – a cyber-crime gaining worldwide attention. In this article we explore ransomware in depth and offer recommendations and instructions to prevent it from happening and to protect your PC.

Ransomware defined:

You can think of ransomware as “data kidnapping”. It is the result of a malware attack that blocks access to a user’s PC data. Once infected, the attackers try to force you into paying money so you can regain access. In some cases there is a threat to publish or delete the data unless the ransom is paid. Data and access is blocked by using strong file encryption.

Computers can be infected whether at home or in the work environment. This includes PCs on an enterprise network or government agency servers.

Some ways of infecting your PC include:

  • Surfing to unsafe or fake websites.
  • Opening emails and email attachments from unknown sources.
  • Opening malicious links in emails, Facebook, Twitter, and from online chat apps such as Skype.

The two main types of ransomware are: Lockscreen and Encryption.

  1. Lockscreen ransomware prevents you from accessing your PC or files and instead displays a full-screen message saying you have to pay a ransom to regain access.
  2. Encryption ransomware prevents you from opening your files by encrypting them. The encryption is very strong (uses an AES-256 “military grade” cipher algorithm), and would take an estimated 3×1051 years to crack. Also, a unique encryption key is generated for each infected computer so you can’t just get someone else’s key.

Note: There are older versions of ransomware that display false messages such as claiming you have performed an illegal activity with your PC. They then state you are being fined by a police force or government agency. We want to stress that these claims are false and can be considered a scare tactic designed to extort money from you.

What is the result of the attack?

While there are various forms of ransomware, all of them prevent you from performing normal PC functions. This includes:

  • Getting locked out! Preventing you from accessing your operating system.
  • Blocked access to files! Files are now encrypted and you can’t access them.
  • Disabled apps! Certain programs (like your web browser), are no longer able to run.

What about the ransom?

Some ransomware attacks involve the victim having to pay money while some make you complete a survey. Payment of money is performed online and sometimes involves the victim having to pay in Internet currency Bitcoins. Due to the nature of those that commit these cybercrimes – there is no guarantee that your data or PC will return to the pre-attack state.

How much do they extort?

Symantec gained access to a malware server in 2012. This provided them first hand insight of the ransoms that were paid out. In a single day 5,700 computers were infected and 2.9% paid the ransom. This comes out to approximately $33,600 for one day.

“Given the number of different gangs operating ransomware scams, a conservative estimate is that over $5 million dollars a year is being extorted from victims. The real number is, however, likely much higher.”[1]

Recent Ransomware attacks…

WannaCrypt; May 12, 2017:

Many users around the world were victims of the malicious “WannaCrypt” software attack which has been considered one of the worst and most widespread cyber-attacks. More than 230,000 computers in over 150 countries were affected. All files on infected PCs were locked and the demanded ransom was 300 dollars in bitcoins.

Interestingly, people running Windows 10 were not targeted by the attack. Despite this, this attack was serious as evidenced in the steps Microsoft took. They took a highly unusual step in providing a security update for all customers to protect even the Windows platforms that are in custom support only. This includes Windows XP, Windows 8, and Windows Server 2003.

Supported versions of the operating system (Vista, Windows 7, 8.1, 10, etc.), have access to the security update MS17-010. If users have automatic updates enabled or have installed the update, they are protected. Microsoft states[2]: “For those organizations who have not yet applied the security update, we suggest you immediately deploy Microsoft Security Bulletin MS17-010“. They go on to state that this attack may evolve over time and additional defense strategies are warranted.

Petya; June 27, 2017:

Companies across Europe and the US were affected by the ‘Petya’ ransomware attacks. Infected computers displayed a message demanding a Bitcoin ransom of $300. Victims were unable to unlock their computers even if they paid the ransom.[3] The instructions included sending confirmation of payment to an email address. However, that email address was shut down by the email provider and there was no way to contact the attacker for a decryption key to unlock their computer.

This ransomware attack exploited the same Microsoft exploit as WannaCry – the vulnerability known as EternalBlue. Even with the patch, this cyber-attack has two other ways to spread within an organization focusing on the network administrator’s tools. Experts believe the initial infection is suspected to have been delivered through email (as with WannaCry).

If Infected With Ransomware:

You are a victim of a ransomware infection once you see some form of ransom demand appearing in a dialog window, an app, or a full-screen message. Unfortunately, this demand is displayed after encrypting your files or disabling some part of your PC.

Before you try to recover your files, Microsoft suggests trying to fully clean your PC with Windows Defender Offline. After this you can try to Backup and Restore in Windows.

We fully agree with Microsoft: “Do not pay any money to recover your files. Even if you were to pay the ransom, there is no guarantee that you will regain access to your PC or files.”

If You Already Paid:

If you paid the ransom, contact your bank and local authorities immediately. Your bank may be able to block the transaction and return your funds if you paid with a credit card. Inform your bank if you did submit credit card details to the cyber thieves.

We suggest you also contact the following government agencies that deal with fraud and scam reporting:

  • In the United States, go to: On Guard Online.
  • In Canada, go to: Canadian Anti-Fraud Centre.
  • For other countries: go to this Microsoft site.

Prevention:

There are safe measures you can take to lessen the impact of attacks and failures and there are ways to prevent malicious attacks from crippling your PC and network.

  1. Keep a current back up of your data files (images, video, documents and music).
  2. Keep your Windows install up-to-date with the latest Windows security updates.
  3. Keep your antivirus program up-to-date. We highly recommend a reputable AV program with active subscription (one that keeps up to recent malicious attacks). We invite you to check out the performance and protection offered by CompuClever Antivirus PLUS.
  4. Do not open email links or files from a sender you do not recognize. In many cases you can recognize a fake email and webpage because they have bad spelling or look unusual.
  5. Be careful where you surf on the internet especially with less reputable sites. There is a greater chance of contracting a malware virus. Quite often unsafe sites can look convincing and have only subtle differences.

Microsoft states[4]: “Look out for strange spellings of company names (like “PayePal” instead of “PayPal”) or unusual spaces, symbols, or punctuation (like “iTunesCustomer Service” instead of “iTunes Customer Service”).”

Stay Safe:

Hundreds of millions of emails that include a ransomware attachment are being sent out every month. Many of these are being blocked and software vendors are working hard to shrink security holes and fix this ongoing cyber-crime.

As can be seen with the information provided here, staying informed, taking precautions, and using safe practices can help prevent you from getting an infection that could save you time and your data. If you require further information on this subject we recommend Microsoft’s Ransomware FAQ page.

[1] http://www.symantec.com
[2] https://blogs.technet.microsoft.com
[3] https://www.theguardian.com
[4] General information on ransomware

Filed Under: Antivirus, CompuClever Antivirus PLUS, online security, PC security, Windows 10, Windows 7, Windows 8 Tagged With: antivirus, PC Security, Petya, Ransomeware, Wannacry, Windows Update

A Quick Start Guide for Digital Care ReadyBoost USB Disc

July 10, 2017 by Andy Thompson


Thanks for choosing Digital Care ReadyBoost Disc, featuring Microsoft ReadyBoost technology. Before you start, please save all your documents and exit all running applications. Follow the steps below to install your Digital Care ReadyBoost Disc and optimize your PC.

Step 1. Insert the Digital Care ReadyBoost Disc to a USB slot of your choice.

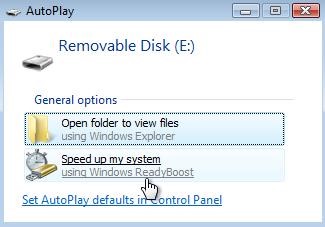
Step 2. If AutoPlay/AutoRun is enabled, you can click the Speed up my system using Windows ReadyBoost option.

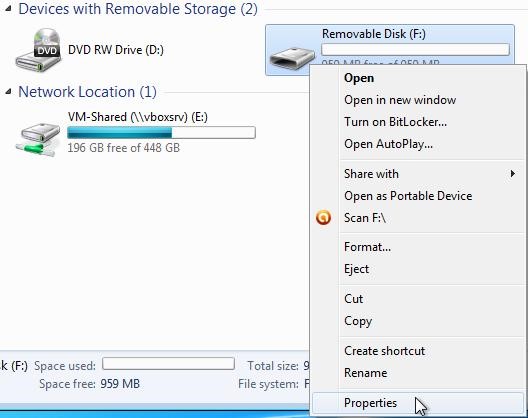
Alternatively, you can open Windows | File Explorer (or use keyboard shortcut: Windows Key + E), right-click the newly discovered removable drive and select Properties from the menu. Select the ReadyBoost tab from the Properties dialog box that appears.

If Windows states that “This device cannot be used for ReadyBoost – The device does not have the required performance characteristics for use in speeding up your system“, follow the instructions of Reformatting Your Digital Care ReadyBoost Disc below. And then come back to this step.

If Windows states that “ReadyBoost is not enabled because this computer is fast enough that ReadyBoost is unlikely to provide additional benefit“, this probably means that Windows is installed on an SSD and no performance gain is possible. Please contact our support team (support@paretologic.com) for further options of how to speed up your PC.


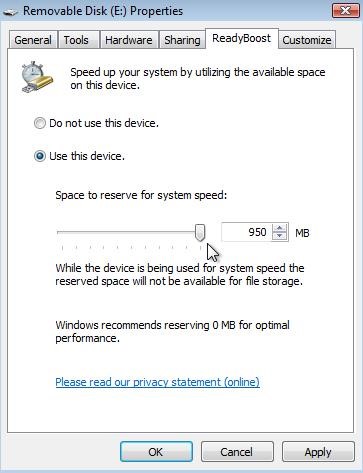
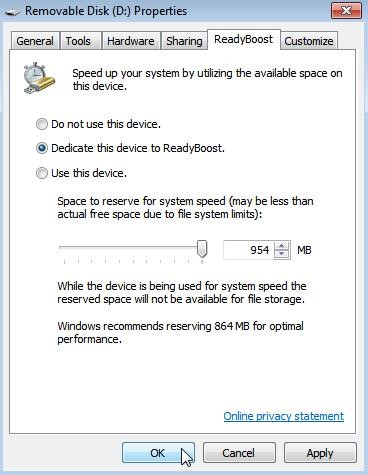
Step 3. If ReadyBoost options appear, you can use the device for speeding up Windows Vista, 7, 8/8.1 or 10.

In Windows Vista, enable the Use this device option and move the Space to reserve for system speed slider all the way to the right.

In Windows 7, 8, 8.1 and 10, select the Dedicate this device to ReadyBoost option.

Click OK and your Digital Care ReadyBoost Disc device is ready!

Reformatting Your Digital Care ReadyBoost Disc

Occasionally, your Digital Care ReadyBoost Disc requires initial reformatting prior being used. Follow the steps below to format your drive.

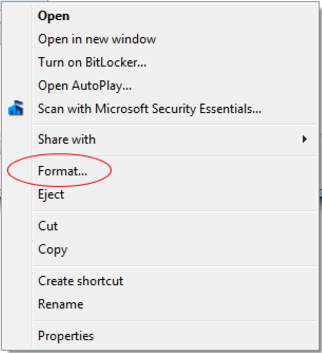
Step 1. Open Windows | File Explorer (or use keyboard shortcut: Windows Key + E), right-click the newly discovered removable drive and select Format.

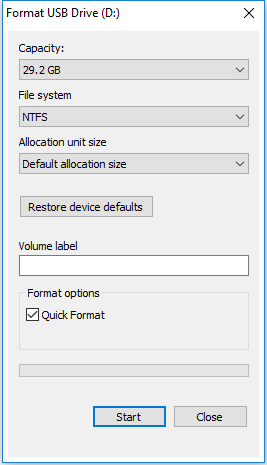
Step 2. In File system dropdown menu, choose NTFS. In Allocation unit size, choose Default allocation size. And check Quick Format under Format options. Click Start.

You will be notified once your Digital Care ReadyBoost Disc has been formatted and ready for being used. Simply follow the steps in the previous section to finish setting up your Digital Care ReadyBoost Disc.

Need Support or Help?

Email us at support@compuclever.com for more information and get help with using your Digital Care ReadyBoost Disc device.

Filed Under: computer fixes, improving performance, increasing speed, PC hardware, PC TuneUp Maestro, ReadyBoost, Windows 10, Windows 7, Windows 8, Windows tips Tagged With: PC Speed, ReadyBoost, User Guide

FAQ – Digital Care ReadyBoost USB Disc

July 7, 2017 by Andy Thompson

 
Q: What is ReadyBoost and how does it help my PC speed?

A: ReadyBoost is a Microsoft Windows technology that allows you to use ReadyBoost compatible USB flash drive, such as Digital Care ReadyBoost USB Disc, as an additional memory. Doing so, ReadyBoost improves your system’s performance by providing quicker access to data compared to accessing the information from the hard drive. To learn more about the ReadyBoost technology, please read this blog post.


Q: What’s the System Requirement for Digital Care ReadyBoost USB Disc?

A: Digital Care ReadyBoost USB Disc supports Windows Vista, Windows 7, Windows 8/8.1, and Windows 10


Q: Do all USB flash drives support the ReadyBoost technology?

A: No. A USB flash drive must meet the minimum random ready and write speeds requirements to support the ReadyBoost feature.  In order for ReadyBoost to work, it requires a USB storage device to have at least: 64MB, USB 2.0, read at 3.5 MB/s, and write at 2.5 MB/s. Our Digital Care ReadyBoost USB Disc well exceeds this requirements.


Q: Aren’t Hard Disks faster than flash? My HDD has 80MB/sec throughput.
A: Hard drives are great for large sequential I/O. For those situations, ReadyBoost gets out of the way. We concentrate on improving the performance of small, random I/Os, like paging to and from disk.


Q: What’s the recommended capacity for a USB flash drive for ReadyBoost?

A: We recommend a 1:1 ratio of flash to system memory at the low end and as high as 3:1 flash to system memory. So if your existing PC has a 4 GB of RAM, then you should choose a 4 GB USB flash drive for ReadyBoost, or consider an 8 GB or 12 GB USB flash drive if possible.


Q: I encounter the message: “This device cannot be used for ReadyBoost – The device does not have the required performance characteristics for use in speeding up your system”. What should I do?

A: Your Digital Care ReadyBoost USB Disc is fully compatible for Microsoft ReadyBoost technology. When you encounter this message, you simply need to format your USB flash drive.

To do so, open Windows | File Explorer (or use keyboard shortcut: Windows Key + E), right-click the newly discovered removable drive and select Format…

In File system dropdown menu, choose NTFS. In Allocation unit size, choose Default allocation size. And check Quick Format under Format options. Click Start.

Once the formatting is completed, your Digital Care ReadyBoost USB Disc is ready to be used.


Q: What does it mean if Windows states that “ReadyBoost is not enabled because this computer is fast enough that ReadyBoost is unlikely to provide additional benefit“?

A: This probably means that your Windows operating systems is installed on an SSD and no performance gain is possible. This is only true in theory because each PC is different. If you feel that your PC is sluggish and requires optimization, please contact our support team (support@CompuClever.com) for further options of how to speed up your PC.


Q: What happens when you remove the drive?
A: When a surprise remove event occurs and we can’t find the drive, Windows fall back to disk. Again, all pages on the device are backed by a page on disk. No exceptions. This isn’t a separate page file store, but rather a cache to speed up access to frequently used data. So no data loss will occur.


Q: Won’t ReadyBoost wear out the drive?
A: Nope. ReadyBoost technology is designed to take care of the lifecycle issues with flash drives and are smart about how and when it performs writes to the device. Relevant third party tests show that you will get at least 10+ years out of flash devices by using the ReadyBoost technology.


Q: How secure is ReadyBoost?

A: ReadyBoost is secure. ReadyBoost by default uses Advanced Encryption Standard 128 (AES-128) encryption, which should be sufficient as the chances of exposing sensitive data are very slim.


Q: What alternatives are there to ReadyBoost?

A: Two alternatives that will significantly improve performance over ReadyBoost are:

  • Using a Solid State Drive (SSD) for your Operating System drive.
  • Adding additional memory (RAM) to your computer.

Nevertheless, neither alternatives are cheap or easy to perform, as compared to using the ReadyBoost option.

Filed Under: improving performance, increasing speed, PC hardware, ReadyBoost, Windows 10, Windows 7, Windows 8, Windows tips Tagged With: PC Speed, ReadyBoost, TuneUp, USB Flash Drive

Repair Windows 7 with Your Recovery Disc

April 10, 2017 by Andy Thompson

A Windows Recovery Disk can repair Windows 7 and restore Windows to its factory default state. If you don’t have a Windows 7 Recovery Disc, you can get from our CompuCleverGEAR site.

How to Repair Windows 7

This process will repair your systems Windows files and is useful for correcting issues within the operating system itself; the process will not delete your personal files or data.  Windows Store programs are also safe, but you may need to reinstall third party programs in some cases.

Insert the USB key, Restart your system. Wait for the first screen to pop up, then, click F8 or F12 (you can see which shortcut key on the screen) to enter the boot menu. Then select USB HDD option on the boot menu.

Win 7 image 1

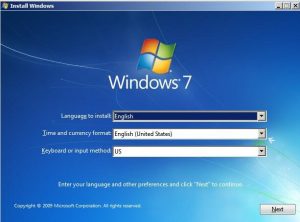
Select the Time and Keyboard options, and click “Next”

Win 7 image 2

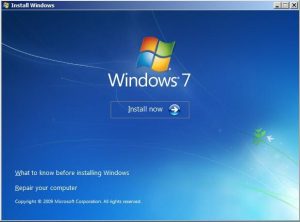
Click “Repair your computer”

Win 7 image 3

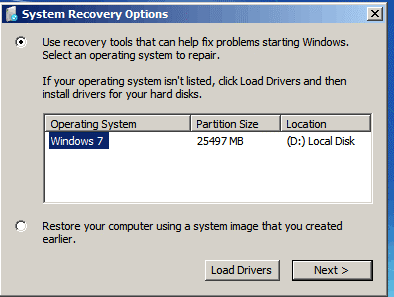
Select the first option: “Use recovery tools that can help fix problems starting Windows. Select an operating system to repair”, click “Next”.

Win 7 image 4

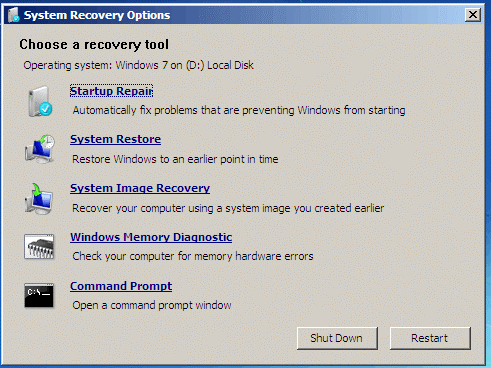
Choose a recovery tool base on your computer problem:

1)  If you have issues about starting, click “Startup Repair”. If it detects a problem, it will automatically fix the problems that are preventing Windows from starting. If not, please select another option.

2)  If you want to restore Windows to an earlier point in time, please click “System Restore”. If you have more than one save point to restore please do them in the order of most recent to oldest.  You may have to restart the computer between each restore to complete the restore process, the computer will tell you is you need to restart the system.

Windows 7 is set to automatically create Restore points so even if you have not created any but have used the system for a while, there normally will be several restore point to choose from.   Using the “System Restore” may remove programs (if they were installed after the date you go to they will need to be installed again), but it will not affect your data files.

3)  If you want to recover your computer using a system image you created earlier, please click “System Image Recovery”.  (Please note, using the “System Image Recovery” will result in data and personal files being erased, as well as programs (unless you created the image after installing your programs).  We advise only using this option when all else fails and after your data files are backed up.) It will search on your system to find the image. If you backup the system image on a DVD, you need to insert the DVD.

Create System Recovery Image

In case the system you purchased did not have an image created you can do this for yourself.  If you are organized you could create one after your programs are installed, this would mean you would only need to backup data files and restoring the image would correct Windows and install all of your programs too!

If you would like to create an image please perform the steps detailed below:

Click Start (normally in the lower left corner of the screen)
Click “Control Panel”
Click “System and Security”
Click “Back up your computer”

The Backup and Restore Center then opens.

Click “Create a system image”

Windows looks for available backup devices, such as a hard drive, DVD burning drive, or network drive.

Choose the location to save your system image
Click “Next”

***Do not save the backup to the recovery partition: FACTORY_IMAGE or Recovery. Doing so corrupts the recovery information.

Confirm the settings, and then click “Start backup”

***Make sure that you have enough blank space on the external drive or enough blank DVDs to create the system image.

Windows will then prepare to create the system image. (If you are backing up to DVD, label and insert a blank DVD in the DVD drive.)

If you are backing up to DVD and a message displays requesting to format the DVD, choose to format the DVD.

If using DVDs label and insert a blank DVD when you are prompted. Continue to follow the on-screen instructions until the image is complete. This might take from several minutes to several hours, please store the backup in a safe place once the image is complete.

Filed Under: Uncategorized, Windows 7 Tagged With: Recovery Disc, Repair Windows 7, windows 7

  • « Previous Page
  • 1
  • 2
  • 3
  • 4
  • …
  • 17
  • Next Page »

Don't miss out

Get a copy of "5 Tips for a Fast PC" when you sign up for our free "PC Tips" newsletter.

Subscribe Now
Archive Newsletter

Recent Posts

  • Ultra File Opener 5.7 Release Note

    Ultra File Opener 5.7 Release Note

    July 24, 2018
  • How Blue Light Affects Your Health and What to Do About It

    How Blue Light Affects Your Health and What to Do About It

    May 11, 2018
  • How to Protect Your Privacy & Identity on Facebook – Part 2

    How to Protect Your Privacy & Identity on Facebook – Part 2

    April 18, 2018
  • Facing the Truth – Facebook & Privacy

    Facing the Truth – Facebook & Privacy

    April 7, 2018
  • Spectre and Meltdown:  Massive Security Holes Impacting All Mac and PC devices

    Spectre and Meltdown: Massive Security Holes Impacting All Mac and PC devices

    January 12, 2018
  • How to Fix Computer Sound Problems

    How to Fix Computer Sound Problems

    December 19, 2017
  • Correct Ergonomics Sitting at a Computer Desk

    Correct Ergonomics Sitting at a Computer Desk

    November 17, 2017
  • Five Useful Tips and Tricks for Windows 10

    Five Useful Tips and Tricks for Windows 10

    August 27, 2017
  • Going Incognito – Browse Web in Privacy Mode

    Going Incognito – Browse Web in Privacy Mode

    August 4, 2017
  • Don’t be Held at Ransomeware

    Don’t be Held at Ransomeware

    July 14, 2017
Contact Us | Privacy Statement | Terms of Use | EULA | Partner With Us | Uninstall | Blog
CompuClever© Systems Inc. 2023 All rights reserved.
Microsoft is a trademark of the Microsoft group of companies. All other trademarks are the property of their respective owners.