• Home
  • Products
  • Purchase
  • Support
  • Company

CompuClever Blog

f.lux – How to Elinimate Digital Eye Strain

May 6, 2016 by Andy Thompson

We’re going to explore night and day and everything in between – as it applies to levels of light.  There are natural lighting levels that we are exposed to as determined by the onset of sunset and sunrise.  Of course night time we may choose to be in front of a monitor or screen but there may be tradeoffs with respect to eye strain, headaches, or improper sleep.  The technology known as “f.lux” may help to alleviate this.  We like the concept and we also like the company as they are dedicated to offering this technology for free.

The Technology

To put it simply, f.lux automatically changes the color of your screen depending on the time of the day, for the purpose of reducing blue light exposure.  During the day time, your screen appears normal and as evening approaches it becomes pinker or rose colored.  It works well with computers and laptops and it can be used to work with iPhones and iPads.  There are also similar applications for Android devices.

Theory

PC screens, monitors, and mobile phones all emit full spectrum light to resemble full daylight conditions.  The makers of f.lux state:

“Exposure to blue light at the wrong time of day can keep you awake later and interfere with the quality of your sleep.  f.lux tries to help this by removing blue and green light to help you wind down in the evenings.”

Day time – we have bright sunlight to help stimulate wakefulness. Night time – lighting is dim and our brains secrete melatonin which causes us to feel sleepy.  It’s a 24-hour rhythm based on an internal circadian clock that is affected by our exposure to light and dark cycles.

While some computers adjust the brightness levels based on sensors, the color temperature does not change.  This is why you see more pink tones when using f.lux which help with melatonin levels and eye strain.

Research To Back It Up:

If you want to see the research behind any of this we encourage you to find independent online studies.  You can also begin with the f.lux page which offers many links to reports and studies from trustworthy sources: https://justgetflux.com/research.html

f.lux – The Company

The f.lux site, like the application, is pretty easy to pick up and understand.  Right up front they describe their technology as a “labor of love”.  It’s free as they pay for the development based on donations received.  They state that 100% of donated money goes to the ongoing development and operations related to f.lux.

In terms of the future of this technology, it appears as though major platform developers are beginning to include some form of night time mode in their operating system.  There is NightShift for Mac and there is Blue Shade for Amazon Fire tablets and Night Mode for Android N.  The makers of f.lux are working to make their technology available on a wide range of operating systems but they have had a hard time with mobile devices due to restrictions from the platform makers.

Before You Decide:

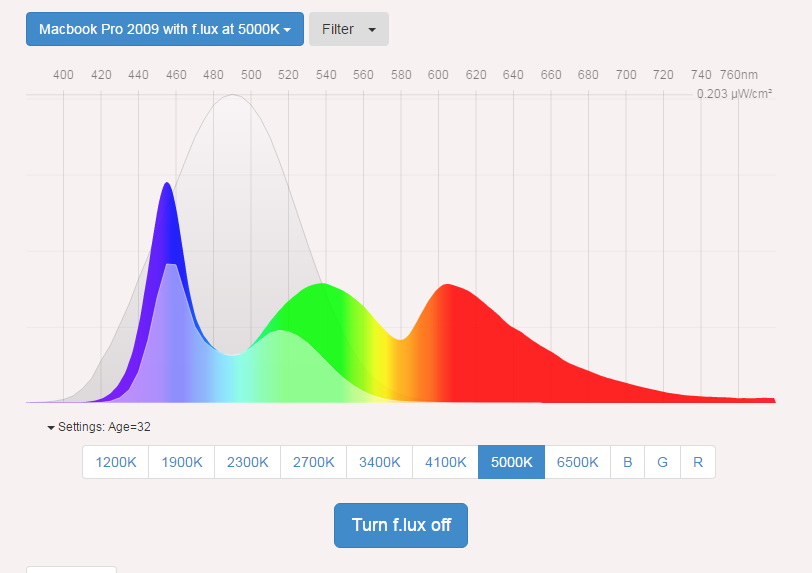
You can always get a preview of how your screen would look if you decide on trying out the f.lux software.  Simply go to the fluxometer page.  You can select your computer or device and try out different levels.

To Start:

If you are running Windows, Mac, or Linux… you can download and install f.lux from their website.  There is also a version for Android devices but there are some limitations – we recommend using Twilight.  Twilight is an Android app that offers similar functions to those of f.lux and we have used the free version of it and find it meets our use requirements and expectations.

For iPhone and iPad users, Mac has a similar feature called Night Shift (for more information on setting this up click here: Enable NightShift on Your iPhone).

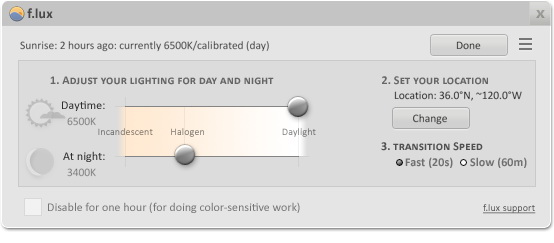
When you have done downloading and installing the software, f.lux will attempt to detect your location.  This may not work so well and we recommend that you click the Change button as seen below and set your location.  As it says on their site: “f.lux works a lot better if it knows exactly where you are (we make a guess, but it’s not always good.)”

You also have the option of adjusting the lighting level for day or night as well as the transition speed.

When Not To Use It:

You may want to disable f.lux at certain times.  For instance if you are working on graphics or images, you can choose to disable it for an hour using the disable option as seen above, or use the Alt-End key combination.  There is a movie mode that disables f.lux for 2 ½ hours.  As the company states on their website: “We designed Movie Mode to preserve sky colors and shadow detail, while still providing a warmer color tone. It’s not perfect on either count, but it strikes a balance.”

FAQ:

If you have questions or issues, start with the frequently asked questions page which has lots of useful information: https://justgetflux.com/faq.html

Final Words:

There are still shortcomings with this technology including a reduction of contrast (blacks turn to a dark shade of red), and with Android, certain buttons can be inaccessible.[1] Overall, you will notice that it is easier on the eyes and decreases glare.

As for sleep… the American Medical Association’s Council on Science and Public Health states: “…exposure to excessive light at night, including extended use of various electronic media, can disrupt sleep or exacerbate sleep disorders”.[2]

If you have to be in front of a monitor or device screen… it makes sense to try f.lux.  We have enjoyed the benefits of this free technology and hope it will help you as well.

We will continue to provide story lines like this that benefit all of us and we will describe them in a manner that is within reach of everyday computer users.  To view our archive of past articles, follow this link: Back Issues. If you have some ideas of topics you would like us to cover, email us at: newsletter@compuclever.com

 

[1] http://www.makeuseof.com/tag/get-good-nights-sleep-filtering-phones-blue-light/
[2] http://www.atmob.org/

Filed Under: Blog, Health & Fitness, PC hardware Tagged With: Blue Light, Digital Eye Strain, Health & Fitness, how to, Review

How to Protect Your Computer from Ransomware

April 29, 2016 by Charles Edward

Ransomware is the latest threat to afflict millions of computer users worldwide. What’s really startling is that even police departments are being affected. Let’s take a look at what ransomware is, and how you can protect yourself against it.

Cyber-criminals have so far collected more than $200 million in the first three months of 2016, and are on track to steal $1 billion by the end of the year.

How?

By tricking regular people, as well as businesses and institutions, to download “ransomware” that takes control of computers and servers. If you want to unlock your computer data, you have to pay the crooks.

It’s a lucrative scam and no one is safe: hospitals, school boards and even police departments have all been blackmailed by ransomware criminals so far this year.

You Don’t Even Have to Download Ransomware to Infect Your Computer

Most recently, Game of Thrones fans were targeted by ransomware just by visiting the Pirate Bay video downloading site.

What’s most frightening about this example is that the visitors to the Pirate Bay didn’t actually download any malicious files.

Instead, all they did was get secretly redirected to a webpage that exploited common security holes in their Internet browser. Ransomware was “injected” into their computer before they knew what was happening.

What is “Ransomware”?

Ransomware is a type of malware—a malicious software program—that, once installed, takes over your computer. Ransomware may prevent your computer from working properly. It can also encrypt or lock away important data, including photos and music files.

The only way to regain control of your computer is to pay off the ransomers, usually by wire transfer or some other untraceable payment method.

How Does Ransomware Get Installed In the First Place?

Sometimes ransomware is downloaded and opened by accident. You may think you are downloading a video file or a useful software program, but in reality you are installing ransomware on your computer.

Sometimes people claiming to be “MS tech support” call you up, and persuade you to download what they claim is some sort of computer utility program.

They walk you through the process, step-by-step, over the phone, to download the ransomware.

Still, what is the most common ransomware “exploit”?

Your Internet browser. Thanks to weak coding, Internet browser security vulnerabilities are being found by cyber-crooks all the time. Visit the wrong web page by mistake and ransomware is downloaded automatically onto your computer.

Once downloaded, a common ruse to complete installation of the ransomware is for a pop-up screen with an “FBI warning” to appear on your computer. Push any button on the popup and the ransomware installation process gets finished, and your computer is hijacked.

Police departments and other government agencies can’t provide much help—they are overwhelmed by other problems and simply cannot track down the cyber-criminals.

So, to get rid of the ransomware and regain control of your computer, the only thing you can do is pay off your hijacker.

Or, you can take steps to avoid downloading the ransomware in the first place.

How to Protect Your Computer from Ransomware

1) Make sure you have antivirus installed

Make sure you have a current, legitimate antivirus program installed on your computer. Antivirus continuously scans for Internet attacks and malicious web pages that try to download ransomware without you knowing it.

Did you know CompuClever offers a comprehensive Internet security solution that continuously blocks Internet attacks and malicious web pages that try to download ransomware without you knowing it?

Check out CompuClever Antivirus PLUS, an innovative security software. CompuClever Antivirus PLUS has received a full mark with a rating of “SOLID” from the prestigious VB100 antivirus testing lab.

2) Hang up the phone on “Microsoft tech support”

Microsoft or any other software company never, ever phones (or emails), offering to help fix a problem they have identified on your computer. If someone claiming to be from tech support phones you up, hang up the phone immediately.

3) Backup your files on an external disk

Make sure important such as photos, music and videos are stored on an external backup drive. Backing up data is easy to do, thanks to cheap USB drives that now have more storage space than some laptops.

If you do download ransomware, before paying the cyber-crooks a single cent, ask a computer-savvy friend for help or obtain professional tech support.

There are many reputable programs and utilities that can help you gain control of your computer.

Have a request for Tech Corner? Email me at newsletter@compuclever.com.

Filed Under: Blog, online security Tagged With: computer scam, hacking, how to, malware, online identity, pc tips

Tech Corner: How to Extend Your Home WiFi With Just a Soda Can

April 25, 2016 by Charles Edward

“A strong WiFi signal makes for a happy home,” should be the new adage for the 21st Century. At least that’s been my experience based on the turmoil my own home falls into when the WiFi is not working properly!

Here are some tips for improving the range of your home WiFi setup.

Note: This trick works best with a wireless router that has external antennas. If your WiFi router doesn’t have antennas, we also provide tips on how to improve home WiFi signal in the 2nd half of the article.

Thanks to PC’s, smartphones, laptops, tablets, iPads, iPods and other mobile gizmos, a strong WiFi signal has become a necessity for modern life.

Everyone in the family now depends on a mobile device to listen to music, binge-watch the latest TV series and communicate with friends.

Beware the WiFi “Dead Zone”

However, it’s also a fact of life in the 21st Century that your home WiFi signal is not always reliable. There always seems to be one or two “dead zones” in the house where there is just no WiFi signal.

It’s annoying for whoever enters a dead zone, and it’s also a challenge for whoever is tasked to somehow solve the problem!

And, unless your hobby is wireless networking, setting up a wireless bridge or repeater is time-consuming and frustrating.

In today’s edition of Tech Corner we have come up with a nifty solution for fixing WiFi dead zones.

How to Extend Your Home WiFi With A Soda Can

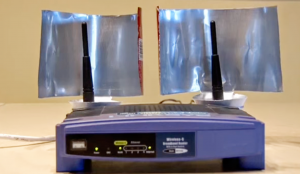
If you can believe it, all it takes to extend your WiFi signal is an empty soda can. This trick takes about two minutes to do, and only requires everyday household objects.

Note: as mentioned, for this trick to work, you’ll need a router with an external antenna.

What You’ll Need

  1. A clean soda can
  2. A pair of sharp scissors
  3. A sharp “box cutter” utility knife
  4. Some mounting putty
  5. A router with an external antenna

Step 1: Prepare Your Can

Any clean, empty and dry soft drink can will do. The only preparation you need to do, apart from washing it, is to remove the tab.

how to extend home wifi

Step 2: Cut the Base of the Can Completely Off

You’ll want to saw off the bottom of the can. You can do this with a box cutter or Exacto knife.

NOTE: Don’t cut off the top of the can—the hole in the top of the can plays an important role in our homemade antenna.

Step 3: Cut Off *Most* of the Top of the Can

Using your utility knife, cut most of the top of the can off. Leave about two centimeters of can, right behind the hole in the top.

how to extend home wifi

Step 4: Cut Open the Can

Cut along the middle of the can in a straight line, opposite to the piece of metal attaching the base.

how to extend home wifi 3

Step 5: Make Your Antenna

Being careful, open up the middle piece of metal by bending it until it vaguely resembles the shape of a radar dish.

Affix some mounting putty to the bottom and slide over the antenna of your WiFi router. If you have two router antennas, try making two pop-can boosters!

how to extend home wifi 6

If you try this out, let us know how it works by sending an email to newsletter@compuclever.com.

More Tips for Improving Your Home WiFi Signal

Here are a few additional tips for improving your home Wifi signal:

1) Make sure your WiFi router is located in a central location

If you can, make sure the router is located in the center of your house, on a top floor. Radio waves best travel down and laterally.

2) Make sure the router is located as high as possible

The WiFi router should be located off the floor, ideally on a wall mount or high shelf.

Also, make sure there are no large items of furniture blocking the signal if possible.

3) Keep away from metal… and mirrors

Metallic surfaces, such as filing cabinets will affect your WiFi signal. Mirrors will as well.

Have a request for Tech Corner? Email me at newsletter@compuclever.com.

Filed Under: Blog

BloomSky – Serious but Fun

April 15, 2016 by Andy Thompson

Welcome to the third and concluding edition of our series on the BloomSky Weather Sensor review. In the previous articles we covered the introduction to the community and the technology. The second article focused on putting the device together right out of the box. Now it’s time to provide information on the software for the device and then give our overall review of the product along with our recommendations

The Device


There are going to be some of our readers who are inspired by this weather sensor technology and want to take the step of buying an actual weather device for themselves. We covered how to assemble the device and now we will look at connecting it with the available software. First we’ll review some of the features of the device.

A Serious Weather Station

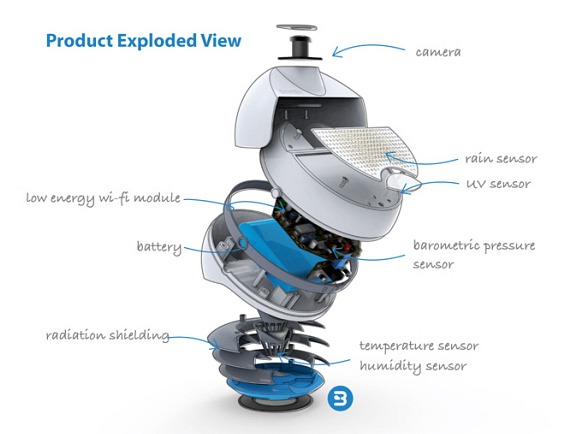
For weather hobbyists, you will immediately recognize the value of the BloomSky device. It has sensors to constantly measure the temperature, humidity, barometric pressure, along with ultra-violet sun exposure and a rain sensor. It is built to withstand weather extremes and it can last 20 days on one battery charge, and it can be powered by solar or AC power.

BloomSky enables you to connect your device and share weather data with Internet weather service like the Weather Underground. Those who are serious about collecting weather data can trust BloomSky’s industrial grade quality when it comes to withstanding the most severe weather conditions. We couldn’t help but share this photo that was posted on Xiao’s, BloomSky’s CEO, personal blog. He proudly stated that the seemingly frozen device below is still powered on, functioning, and transmitting weather data!

Dashboard – the Device Software

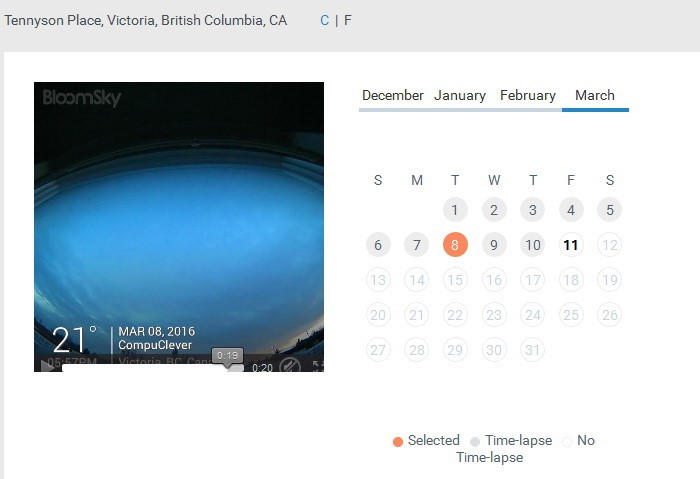
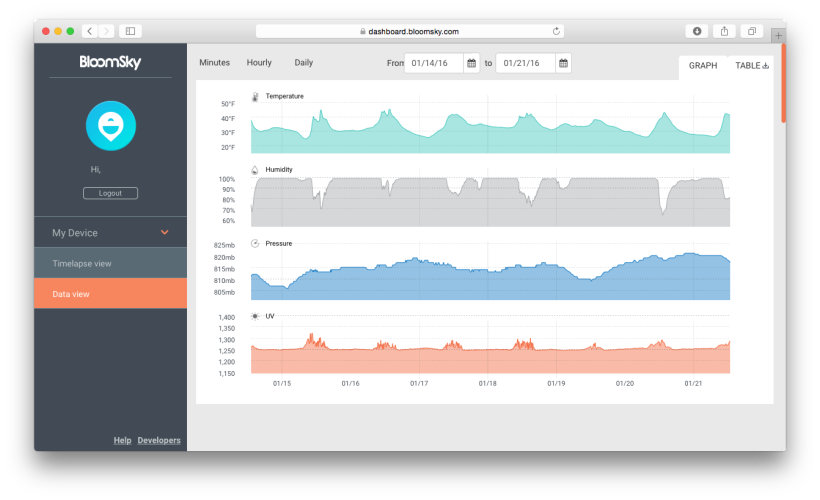
To connect to your device and examine the data that is now being collected, you can access the software known as the dashboard. Simply go to this link: https://dashboard.bloomsky.com/ using your desktop or mobile device. You’ll need to create an account with a user name and password. Once your device is up and running for a day or more, you can view time-lapse captures of previous days’ recordings using a calendar view to select the day you want to view.


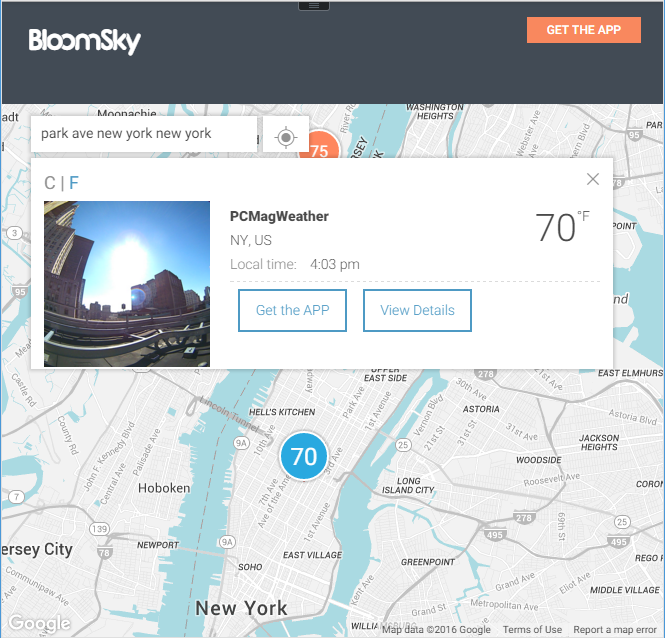
There is also a Data view with graphs that display the weather information you are taking from your location as can be seen here:

A Fun Device

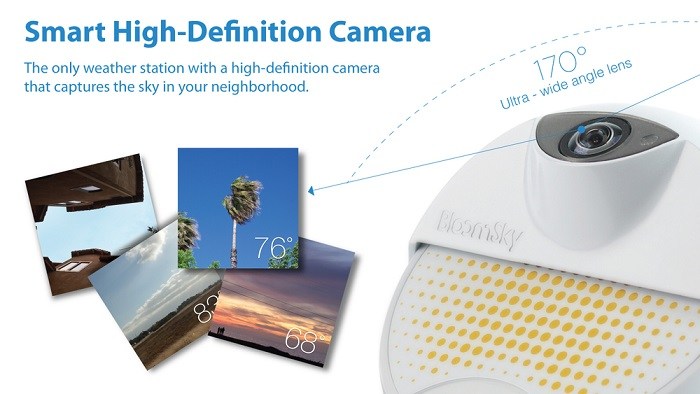
For those of us who are not weather hobbyists, BloomSky is a fun device that allows you to connect with others in ways that you’ve never imagined before. The BloomSky device takes pictures of the sky every few minutes and has a fish-eye lens that is pointed upwards. The 170 degree ultra-wide lens can be adjusted vertically.

The devices are designed to forward images to the BloomSky website, which assembles the pictures and produces a time-lapse video on its cloud-based network. You can then check out the weather in another location for yourself and get a firsthand look at transmissions along with corresponding temperature measurements. So, by getting this unit, you are plugging yourself into a weather information network.

Furthermore, all of the information collected, including the time-lapse video generated daily, can be easily shared with the rest of the world including your family and friends who may be keen on admiring the weather you are enjoying. Along with the BloomSky website, sharing is also made easy through the BloomSky app, which supports mobile devices running on either the iOS (Apple App store) or Android (Google Play) platform. What’s also amazing is that your friends and family can subscribe to your BloomSky weather station through the app and receive not only daily time-lapse videos but also “push messages” you send regarding important updates and alerts.

Our Tech Corner Evaluation:

Our Technical Support specialist Richard has this to say:

I have to admit that at first blush I was skeptical of the weather sensor device. It wasn’t that I did not believe it could be accurate in its measurements or incapable of handling wet or cold weather, but rather the utility of such a device. That is always the acid test isn’t it, what purpose does it serve?

For some people being able to check the weather conditions at home while they are away is valuable, but then you’d have to be away from home for long periods to justify it. So, I went to the BloomSky webpage to see if they could sell me on it.

One of the first things I came across was IFTTT technology (IF This, Then That). This refers to the ability to use the information gathered from the device for a purpose. Simply put, if a condition arises than a corresponding action ensues. That is to say, you would be able to set your home thermostat according to the temperature changes. “For example, you can have BloomSky trigger your connected thermostat to turn on (or off) when an outside temperature is reached.” We see other options are available as well including have your home thermostat adjusted remotely using a device such as a Wi-Fi thermostat controller. Or, you could simply contact a friend or neighbor who could adjust it for you. There is also the option to have it record data and present it to you. Getting an idea of how much rainfall you had locally or overnight or tracking freezing temperatures could be very useful for farmers and gardeners.

As global weather and forecasting becomes increasingly variant and harder to predict, the value of this technology could be even more salient. BloomSky has also placed considerable effort toward establishing a weather network community. They have a Facebook page and anyone can join in regardless of whether you have the BloomSky hardware.

Recommendation and Offer

We feel that this is really the definition of an emerging technology, and the impact is hard to predict, but we can easily see value for such devices as it relates to automation of homes, for people to use in their businesses, and to assist with travel plans. In reading their blogs we also see opportunities to learn about how weather affects people in different vocations and walks of life. Certainly handling the device for a couple of days, and seeing what is being done with it has been an education for our team.

An offer for our readers:

For those who are interested in joining the BloomSky network, BloomSky is currently offering an unprecedented special promotion to our readers. Simply follow the link and use coupon code: COMPUCLEVER to get up to $40 off when you purchase a solar powered BloomSky weather station.

Disclaimer: CompuClever will not financially benefit from any purchase that may result from this article, which serves as a purely independent review.

With the BloomSky device the sky may really be the limit!

We hope you enjoyed our volume of the newly minted “Gears and Gadgets” column. We will bring more creative and smart high-tech products to you on a regular base. If you have any specific interest that you would like us to cover, simply send us an email to: newsletter@compuclever.com
Filed Under: Blog, Gears and Gadgets, Outdoor, Smart Device Tagged With: BloomSky, Gears and Gadges, Product Review

BloomSky Weather Sensor – Setup

April 8, 2016 by Andy Thompson

Welcome to the next installment of our series on BloomSky – the weather technology. In this article we review the BloomSky Weather sensor. We will be taking the device, as any new user would, out of the box. Then we will follow the instructions and put it together. Get ready for our first impressions offered by our Tech Support specialist as he unwraps and assembles the weather sensor device from BloomSky.

When the box from BloomSky arrived, Andy was quite excited about it. So, I was somewhat surprised when he asked me to set up the unit and document the proceedings. I’m Richard from the Technical Support team and I would think the assumption is that this should be a snap for me, right? The truth is I learn how to do things by repetition – doing them over and over. However, it’s not likely that I would be a good assembly line worker – my strength is working with computers! So, if I can succeed at setting this up… most anyone can.

An offer for our readers:
For those who are interested in joining the BloomSky network, BloomSky is currently offering an unprecedented special promotion to our readers. Simply follow the link and use coupon code: COMPUCLEVER to get up to $40 off when you purchase a solar powered BloomSky weather station. 

Disclaimer: CompuClever will not financially benefit from any purchase that may result from this article, which serves as a purely independent review.

Out of the Box:

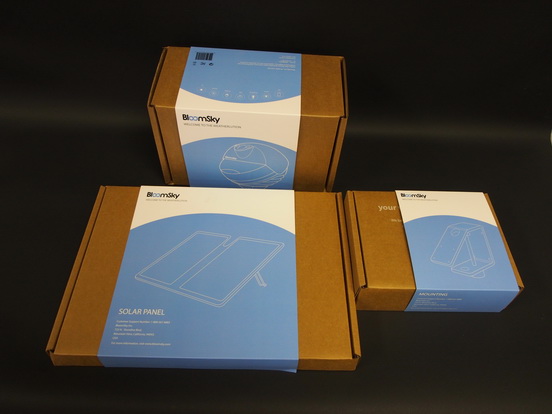
We received the Solar Powered Weather kit that includes both the solar panel and the mounting bracket. To begin, I opened one box to find three smaller boxes as can be seen below. One was for the main sensor, and it included the electrical adaptor and the central mounting pole. The flat box contained the solar panel. The third box (the smallest), had the mounting bracket.

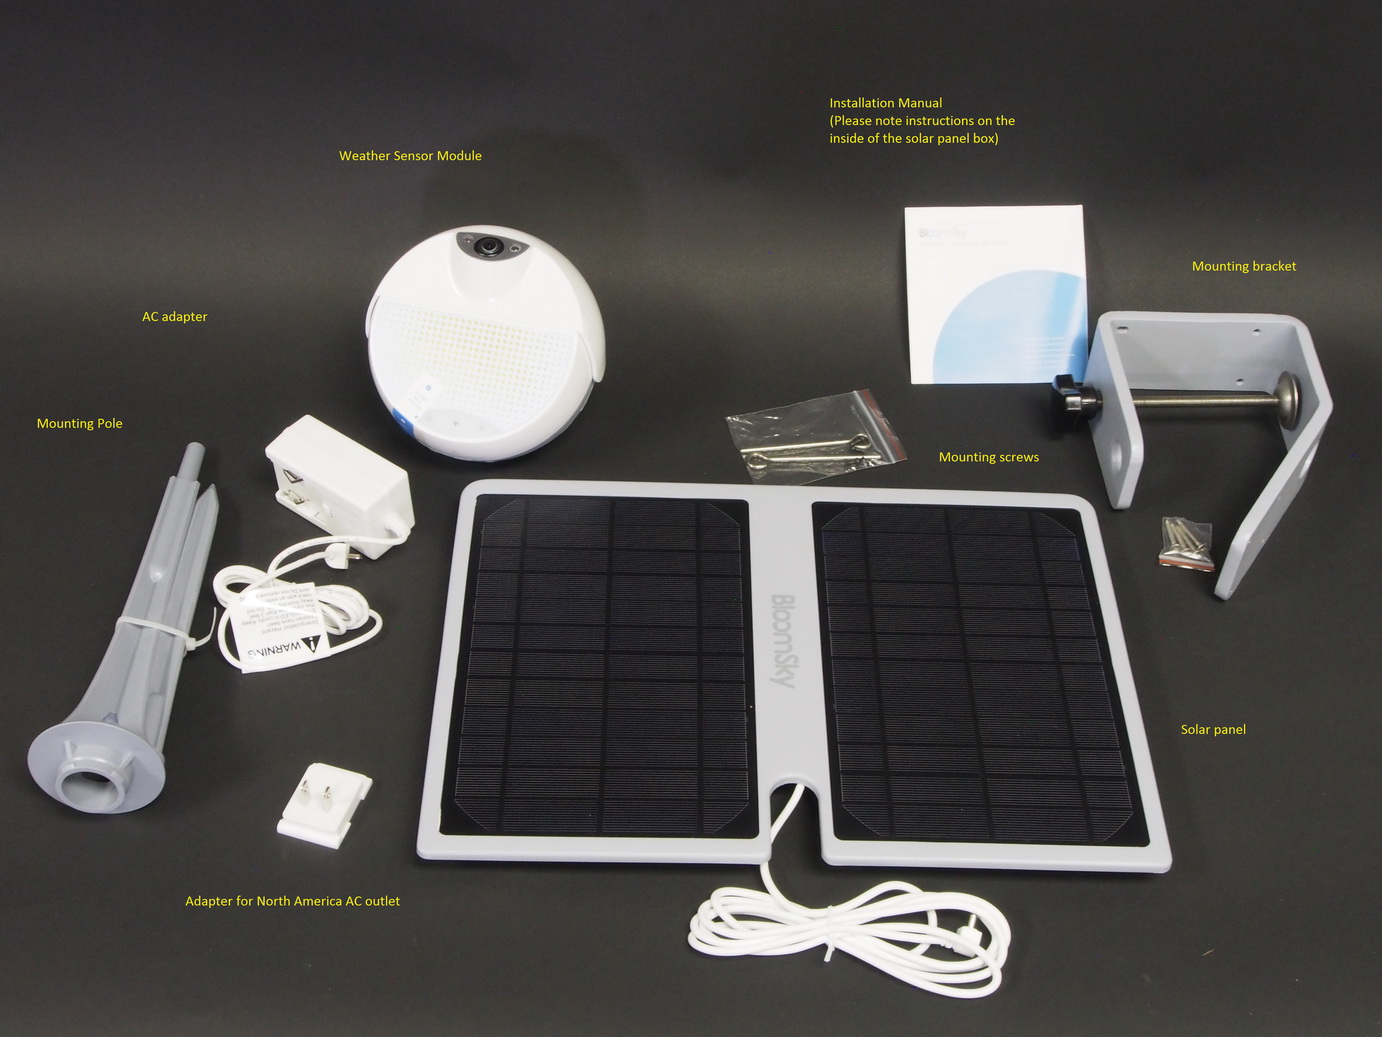
I found a couple packages of screws to help with mounting the assembled unit. Also included is a brief manual to help with setting up the system.

Opening the boxes you will find the following items as depicted in the image below:

  • weather sensor module
  • mounting bracket
  • mounting pole
  • AC adaptor
  • solar panel (as an alternative power source)

Putting it Together:

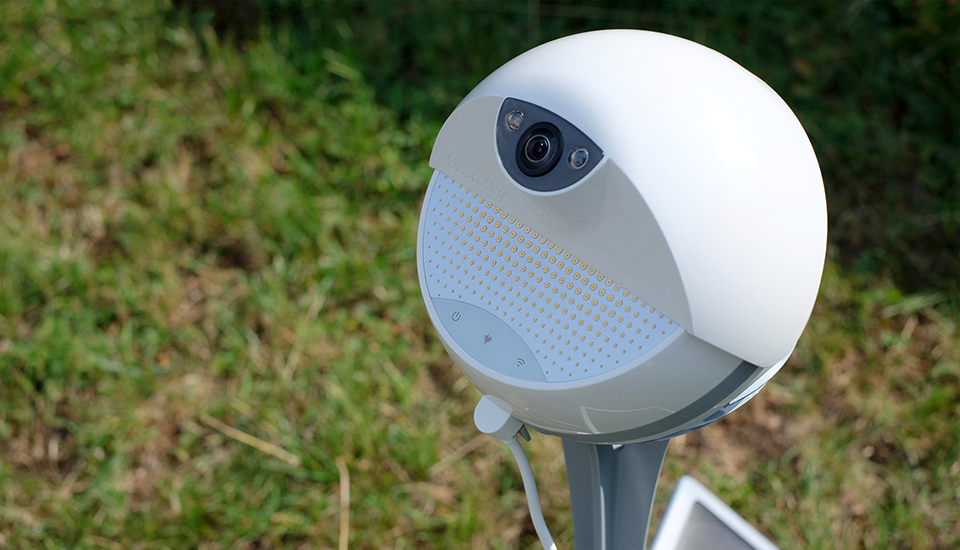
The assembly is fairly simple. First, you assemble the sensor unit and the mounting pole. Begin by connecting the two pieces of the mounting pole together. Next, connect the sensor module to the top of the pole. There are four little notches to fit the sensor on the pole (you can see a couple of the guides at the top of the pole in the main picture). Once down, turn the sensor to the side to secure it on the pole.

Now you have to decide whether or not to use the mounting bracket. This really depends on two conditions:

  1. How you plan to power the sensor unit, and
  2. The location of the device (Note: distance to your Wi-Fi router needs to be factored in as we mention below).

Keep in mind, these conditions impact one another. If you plan to have the sensor in a place higher up where there is no AC power outlet close by, you have to use an extension cord or consider the solar power option, which necessitates the use of the mounting bracket. Also, if you want to place the sensor at a location where you can’t drive the mounting pole into a piece of lawn or a flowerbed, then you also need to use the mounting bracket.

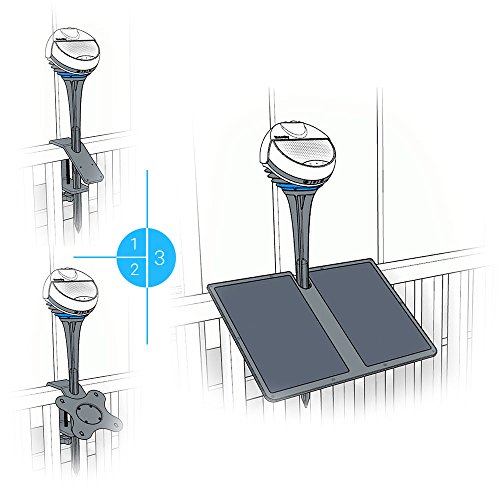
If you have decided to use the mounting bracket, find a place to secure it. You could clamp it over your patio railing, as shown above, or simply screw it to a vertical fixture. If you plan to use the solar panel, there is a mounting plate on the underside of the solar panel. You need to slide it up so you can remove it from the panel and then attach it to the main mounting bracket. There are four small holes on the angled part of the bracket where you attach the plate to the bracket using four dark screws that came with the larger plastic bag as seen in the picture that shows all the parts.

Once the mounting bracket is in place, as seen in part 2 of the illustration shown above, slide the mounting pole (with the sensor unit attached), down through a hole near the top of the angled piece of the mounting bracket and then through a hole near the turn handle on the bracket. Next, slide the solar panel back onto the mounting plate and make certain it is secure, and will not slide off the plate. The notch in the panel denotes the top side of the panel and is necessary for the panel to connect securely when the central pole is in place.

Power Up and Connection

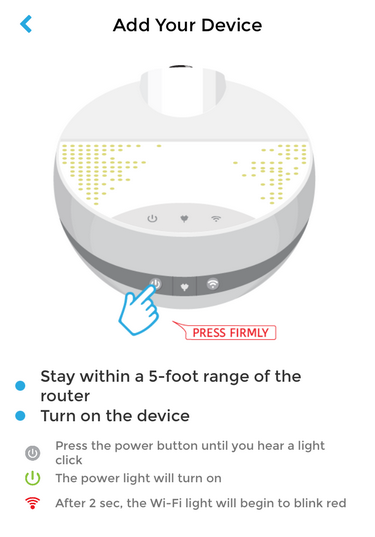
The cable from the solar panel (or the AC adaptor) clicks into a connector at the bottom of the module; you will need to move the cover to the side to insert it. To the left of the power connection is the power switch for turning the module on and off. To the right of that connection is a button to reset the Wi-Fi connection.

Once the unit is assembled and powered up, you can start the process of connecting it to the Internet. A smart phone or tablet (iOS or Android), with an established connection to the Internet is required at this step. You also need to download and install the BloomSky app from either the Apple App store or the Google Play store. Your smart phone or tablet acts like a conduit so that you can use the BloomSky app to connect the weather sensor to the Internet.

Once connected, the app will install and guide you through connecting the sensor to your Wi-Fi and your phone or tablet. You will need to sign on to the router which involves supplying the router name and password. From there it will connect with the sensor and have you up and running in three minutes or less!

Our Review:

We found the assembly to be a straightforward process without any real hiccups. The instructional documentation is brief but doesn’t complicate what is a fairly straightforward assembly. The unit is largely metal so it should stand up to any harsh weather conditions. Also, the clamping system is very sturdy. When put together the unit is secure and not flimsy in any way.

To provide an unbiased and instructive review, we would also like to point out a few issues that we ran into during the installation and configuration process:

  • The design of the mounting bracket is somewhat peculiar. Primarily designed as a clamp-on device, it can only be used with a horizontal bar that is less than two inches wide. Given that two-by-fours are the common building material for decks, we couldn’t make proper use of the mounting bracket. We recommend that BloomSky design a different mounting bracket that is not limited by the width of the mounting surface.
  • The most “technical” part of the configuration process is likely the part where you connect the sensor module to your Wi-Fi network. In our experience, it took a few timed-out attempts before the unit connected successfully. We attributed the issue to the distance between our unit and the wireless router – about 50 feet apart from each other. So we suggest you take the distance between your Wi-Fi router and the device into consideration when selecting a location to install.

We recommend you read and follow the instructions, as seen above and shown on your mobile app. This includes performing steps in the right order. This should largely reduce the chance of failures and make your installation process a happy experience!

Recommendation to Date

To recap… we are pleased with the BloomSky hardware in terms of ease of assembly, instructions given, and even the quality of the materials / device. The software to connect to the device is easy to understand and to use. For our next article, we will continue our review of the BloomSky technology including our experience with the information it collects such as the time-lapse videos it generates, and we will finish with a complete overall review.

We hope you enjoyed this edition of Gears and Gadgets. We plan to offer our final review and recommendation in the last article of this series available to you in the next few days. Feel free to email us with questions and comments: newsletter@compuclever.com
Filed Under: Blog, Gears and Gadgets, Newsletter, Outdoor, Smart Device Tagged With: BloomSky, Gears and Gadges, Installation, setup, Wifi

  • « Previous Page
  • 1
  • …
  • 5
  • 6
  • 7
  • 8
  • 9
  • …
  • 30
  • Next Page »

Don't miss out

Get a copy of "5 Tips for a Fast PC" when you sign up for our free "PC Tips" newsletter.

Subscribe Now
Archive Newsletter

Recent Posts

  • Ultra File Opener 5.7 Release Note

    Ultra File Opener 5.7 Release Note

    July 24, 2018
  • How Blue Light Affects Your Health and What to Do About It

    How Blue Light Affects Your Health and What to Do About It

    May 11, 2018
  • How to Protect Your Privacy & Identity on Facebook – Part 2

    How to Protect Your Privacy & Identity on Facebook – Part 2

    April 18, 2018
  • Facing the Truth – Facebook & Privacy

    Facing the Truth – Facebook & Privacy

    April 7, 2018
  • Spectre and Meltdown:  Massive Security Holes Impacting All Mac and PC devices

    Spectre and Meltdown: Massive Security Holes Impacting All Mac and PC devices

    January 12, 2018
  • How to Fix Computer Sound Problems

    How to Fix Computer Sound Problems

    December 19, 2017
  • Correct Ergonomics Sitting at a Computer Desk

    Correct Ergonomics Sitting at a Computer Desk

    November 17, 2017
  • Five Useful Tips and Tricks for Windows 10

    Five Useful Tips and Tricks for Windows 10

    August 27, 2017
  • Going Incognito – Browse Web in Privacy Mode

    Going Incognito – Browse Web in Privacy Mode

    August 4, 2017
  • Don’t be Held at Ransomeware

    Don’t be Held at Ransomeware

    July 14, 2017
Contact Us | Privacy Statement | Terms of Use | EULA | Partner With Us | Uninstall | Blog
CompuClever© Systems Inc. 2023 All rights reserved.
Microsoft is a trademark of the Microsoft group of companies. All other trademarks are the property of their respective owners.