• Home
  • Products
  • Purchase
  • Support
  • Company

CompuClever Blog

BloomSky Weather Sensor – Setup

April 8, 2016 by Andy Thompson

Welcome to the next installment of our series on BloomSky – the weather technology. In this article we review the BloomSky Weather sensor. We will be taking the device, as any new user would, out of the box. Then we will follow the instructions and put it together. Get ready for our first impressions offered by our Tech Support specialist as he unwraps and assembles the weather sensor device from BloomSky.

When the box from BloomSky arrived, Andy was quite excited about it. So, I was somewhat surprised when he asked me to set up the unit and document the proceedings. I’m Richard from the Technical Support team and I would think the assumption is that this should be a snap for me, right? The truth is I learn how to do things by repetition – doing them over and over. However, it’s not likely that I would be a good assembly line worker – my strength is working with computers! So, if I can succeed at setting this up… most anyone can.

An offer for our readers:
For those who are interested in joining the BloomSky network, BloomSky is currently offering an unprecedented special promotion to our readers. Simply follow the link and use coupon code: COMPUCLEVER to get up to $40 off when you purchase a solar powered BloomSky weather station. 

Disclaimer: CompuClever will not financially benefit from any purchase that may result from this article, which serves as a purely independent review.

Out of the Box:

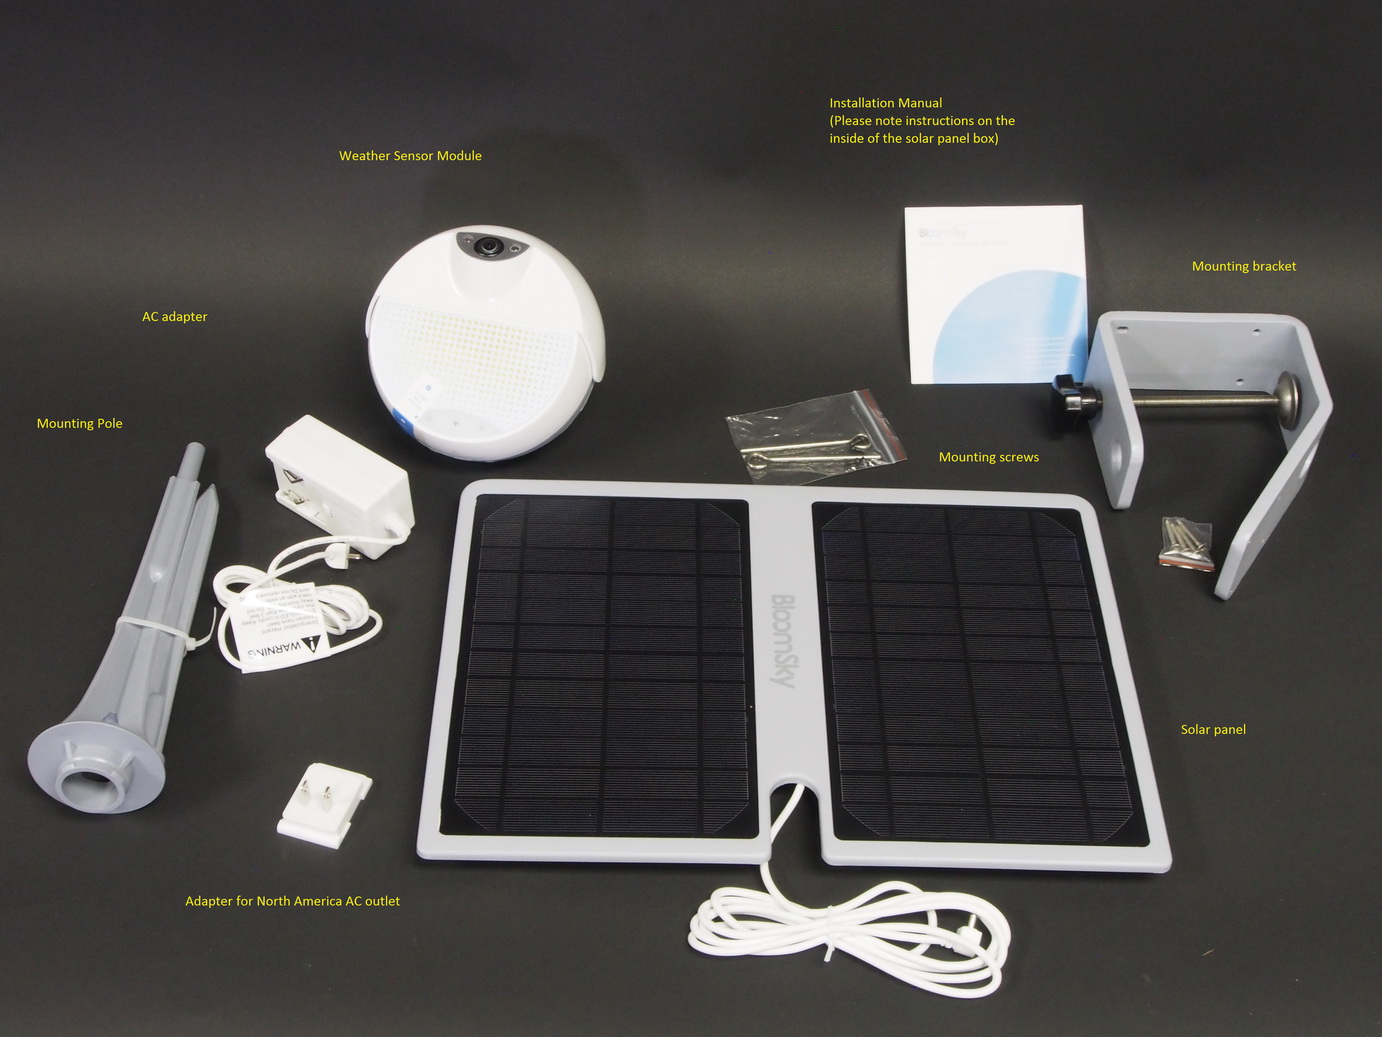
We received the Solar Powered Weather kit that includes both the solar panel and the mounting bracket. To begin, I opened one box to find three smaller boxes as can be seen below. One was for the main sensor, and it included the electrical adaptor and the central mounting pole. The flat box contained the solar panel. The third box (the smallest), had the mounting bracket.

I found a couple packages of screws to help with mounting the assembled unit. Also included is a brief manual to help with setting up the system.

Opening the boxes you will find the following items as depicted in the image below:

  • weather sensor module
  • mounting bracket
  • mounting pole
  • AC adaptor
  • solar panel (as an alternative power source)

Putting it Together:

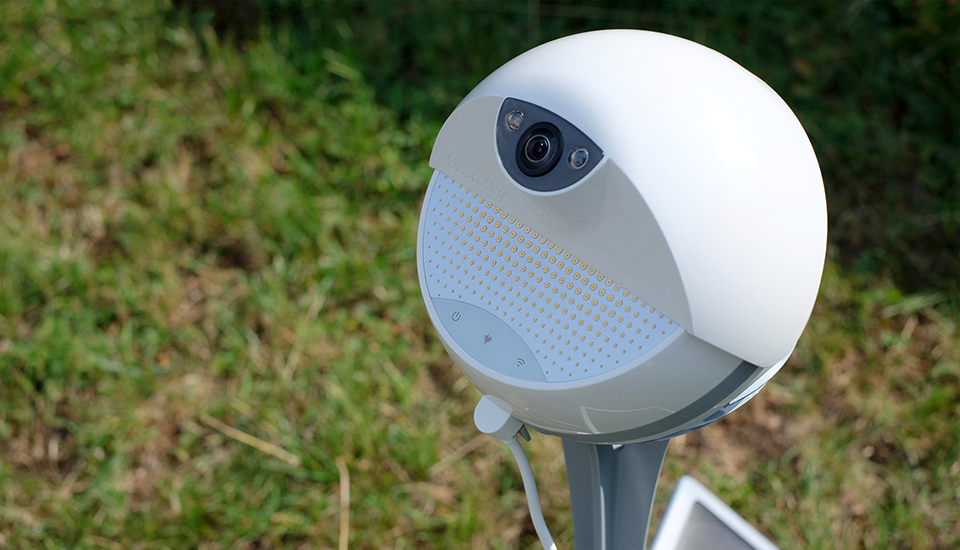
The assembly is fairly simple. First, you assemble the sensor unit and the mounting pole. Begin by connecting the two pieces of the mounting pole together. Next, connect the sensor module to the top of the pole. There are four little notches to fit the sensor on the pole (you can see a couple of the guides at the top of the pole in the main picture). Once down, turn the sensor to the side to secure it on the pole.

Now you have to decide whether or not to use the mounting bracket. This really depends on two conditions:

  1. How you plan to power the sensor unit, and
  2. The location of the device (Note: distance to your Wi-Fi router needs to be factored in as we mention below).

Keep in mind, these conditions impact one another. If you plan to have the sensor in a place higher up where there is no AC power outlet close by, you have to use an extension cord or consider the solar power option, which necessitates the use of the mounting bracket. Also, if you want to place the sensor at a location where you can’t drive the mounting pole into a piece of lawn or a flowerbed, then you also need to use the mounting bracket.

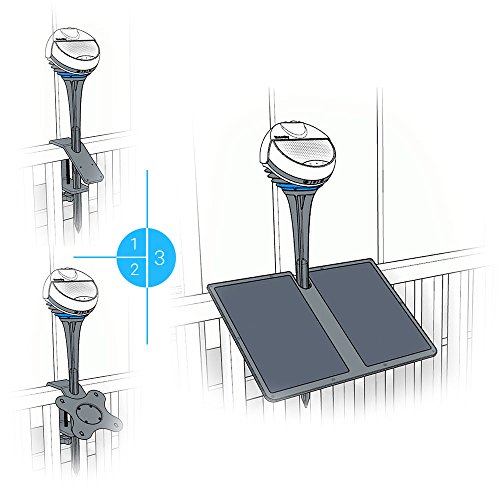
If you have decided to use the mounting bracket, find a place to secure it. You could clamp it over your patio railing, as shown above, or simply screw it to a vertical fixture. If you plan to use the solar panel, there is a mounting plate on the underside of the solar panel. You need to slide it up so you can remove it from the panel and then attach it to the main mounting bracket. There are four small holes on the angled part of the bracket where you attach the plate to the bracket using four dark screws that came with the larger plastic bag as seen in the picture that shows all the parts.

Once the mounting bracket is in place, as seen in part 2 of the illustration shown above, slide the mounting pole (with the sensor unit attached), down through a hole near the top of the angled piece of the mounting bracket and then through a hole near the turn handle on the bracket. Next, slide the solar panel back onto the mounting plate and make certain it is secure, and will not slide off the plate. The notch in the panel denotes the top side of the panel and is necessary for the panel to connect securely when the central pole is in place.

Power Up and Connection

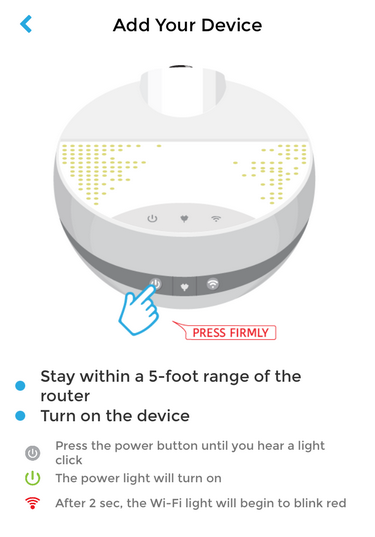
The cable from the solar panel (or the AC adaptor) clicks into a connector at the bottom of the module; you will need to move the cover to the side to insert it. To the left of the power connection is the power switch for turning the module on and off. To the right of that connection is a button to reset the Wi-Fi connection.

Once the unit is assembled and powered up, you can start the process of connecting it to the Internet. A smart phone or tablet (iOS or Android), with an established connection to the Internet is required at this step. You also need to download and install the BloomSky app from either the Apple App store or the Google Play store. Your smart phone or tablet acts like a conduit so that you can use the BloomSky app to connect the weather sensor to the Internet.

Once connected, the app will install and guide you through connecting the sensor to your Wi-Fi and your phone or tablet. You will need to sign on to the router which involves supplying the router name and password. From there it will connect with the sensor and have you up and running in three minutes or less!

Our Review:

We found the assembly to be a straightforward process without any real hiccups. The instructional documentation is brief but doesn’t complicate what is a fairly straightforward assembly. The unit is largely metal so it should stand up to any harsh weather conditions. Also, the clamping system is very sturdy. When put together the unit is secure and not flimsy in any way.

To provide an unbiased and instructive review, we would also like to point out a few issues that we ran into during the installation and configuration process:

  • The design of the mounting bracket is somewhat peculiar. Primarily designed as a clamp-on device, it can only be used with a horizontal bar that is less than two inches wide. Given that two-by-fours are the common building material for decks, we couldn’t make proper use of the mounting bracket. We recommend that BloomSky design a different mounting bracket that is not limited by the width of the mounting surface.
  • The most “technical” part of the configuration process is likely the part where you connect the sensor module to your Wi-Fi network. In our experience, it took a few timed-out attempts before the unit connected successfully. We attributed the issue to the distance between our unit and the wireless router – about 50 feet apart from each other. So we suggest you take the distance between your Wi-Fi router and the device into consideration when selecting a location to install.

We recommend you read and follow the instructions, as seen above and shown on your mobile app. This includes performing steps in the right order. This should largely reduce the chance of failures and make your installation process a happy experience!

Recommendation to Date

To recap… we are pleased with the BloomSky hardware in terms of ease of assembly, instructions given, and even the quality of the materials / device. The software to connect to the device is easy to understand and to use. For our next article, we will continue our review of the BloomSky technology including our experience with the information it collects such as the time-lapse videos it generates, and we will finish with a complete overall review.

We hope you enjoyed this edition of Gears and Gadgets. We plan to offer our final review and recommendation in the last article of this series available to you in the next few days. Feel free to email us with questions and comments: newsletter@compuclever.com


Filed Under: Blog, Gears and Gadgets, Newsletter, Outdoor, Smart Device Tagged With: BloomSky, Gears and Gadges, Installation, setup, Wifi

Keep’n It Cool

March 19, 2016 by Andy Thompson

Things are heating up – which means PC temperatures are rising. Just how important is it to make certain that your PC does not overheat? We’ll introduce a story from one of our expert support technicians and then get into potential issues that can result. We’ll conclude with ways of addressing overheating PC systems and laptops.

With our previous article (ReadyBoost) we received some email responses that were very positive. One email responder stated that he and a group of friends got some real benefit from the free technology we presented. One of the members of the group stated that their PC was “…working much more smoothly after implementing your USB know how.” The email went on to suggest we cover the topic of making sure that the “computers processor runs as cool as possible and what to do if it is running to hot.” That’s a great suggestion and we had already begun to write about this subject.

We’ll get started with a story from one of our Tech Support specialists.

Fan or Wireless Connection?

You can find all sorts of odd occurrences with your PC system and sometimes the oddest issue can arise with what appears to be no solution in sight. My system had been in use for a few years and when I heard a small high pitched squeal, I figured a fan was going. No problem, the case was cool and the temperature was not anywhere near being a problem.

The problem that was driving me crazy however was my internet connection. The system was using a wireless connection and it had developed an intermittent disconnect. The first couple of connection drops I put down to just a random issue and ignored. But they continued to happen and eventually the system could not connect to the internet. Okay… time to put on the troubleshooting hat and work this out.

I checked the wireless connection using a laptop, it worked so the issue was not the wireless. I checked the router to make certain there was not some sort of issue where the computer was not being allowed onto the network. I found nothing of the sort.

Next, I reinstalled the software for connecting to the router, double and triple-checked the settings only to find that everything was correct. I spent a couple of evenings going over every possible inch of the network wireless connection and could not find a problem.

In frustration, and after listening to the fan for a couple of days, I said: “Fine! I’ll replace the fan, at least that much I can fix!” I powered the computer off, pulled the problem fan and got a replacement. After I had it installed and started a system back up, my jaw promptly went slack! My PC had signed onto the network right away. I had my wireless internet connection once again.

Potential Problems and Pointers:

The PC system does not have one temperature. It has several components and each run at a different temperature. The CPU (Central Processing Unit), for your PC does most of the work so that Windows and running programs perform as expected. That is to say, it processes all the tasks. Ideally it should be running at room temperature. Most recently built CPU’s have protection features to deal with the heat. However, there are circumstances where it can run hot for extended periods of time and problems can arise including system crashes and even physical damage to the CPU or other components.

Recommendation: Aim to have your CPU running at 45 – 50 degrees C (113 – 122 F) to be on the safe side. The absolute maximum should be 60 degrees (140 F) maximum.

There are other components that can use electricity and generate heat such as your hard disk drives, the optical drive (for CD’s and DVD’s), and the GPU (Graphics Processing Unit) which really comes into play when playing games. Excessive heat can damage components rendering them inoperable. With respect to hard drives, one source states:

Heat decreases the life of the hard drive head. A 5 °C increase in temperature could reduce the life of a hard drive by up to two years[1].

Heat can also warp the hard drive disks to the point that you would no longer be able to retrieve the data stored on them. Even recovering data in these situations may not be possible. The effects of this are greater with older components. Another factor to consider, one that most experts will agree, is that the lifespan of your PC will be lessened by excessive heat.

There are free utility programs to check for PC temperatures if you feel your system is running hot and we’ll leave that for you to search online. A few basic precautionary measures can go a long way to prevent issues arising from over-heating your system.

Laptops: Although they produce less heat, they are tightly packed and can be more challenging to remedy. Make sure your laptop has adequate air flow and not running on a cushion or pillow, or inside a tightly enclosed area. Damage to laptops can include failure to components and decreased lifespan. There have even been reports of overheated laptops burning down homes.[2][3] 

Signs of overheating can include:

  • Fan running constantly and making excessive noises.
  • Basic tasks are impaired / slow.
  • Lines on your screen.
  • Your system freezes or abrupt shutdowns occur (including blue screen of death).

Recommendations:

Excessive heat is typically due to inability to cool your PC down. It could be a faulty fan or it could be due to poor ventilation. Ventilation is quite often affected by a number of easily remedied factors. Check if any of these could be what you are facing:

  • Is your PC tower directly against a wall and not getting adequate air flow to it?
  • Are any boxes or papers covering the back of the tower where the fan vent is located?
  • Is the fan functional or making any noises (as with our story above)?
  • When you look at the back of your PC tower, is there excessive dust that could be clogging up the ventilation?
  • Is your ambient room temperature overly hot?

If you are experiencing any of these contributing factors, you may find it easy to fix the situation and get your PC operating at normal temperatures. Keep your system clean and make sure the ambient temperatures are reasonable. For your laptop, you can easily provide better exposure to air circulation by putting it up on a box (you might have to look at using a USB keyboard and mouse).

As our technician detected right away… high pitched whirling sounds need to be addressed. Make sure your fan is working. If it is not within your level of expertise, get a quote from a technician. Fixing a PC fan is not very expensive – you should be able to have this done for under a hundred dollars.

And, in case you are wondering what the connection is between a malfunctioning fan and not being able to get a wireless connection… it was discovered by our technician that the fan was emitting a high frequency tone. It was this tone that caused an interference with the wireless connection!

Conclusions:

As our email responder has stated to us, there are many PC users who have no interest in keeping up with the endless “…trend of system upgrades”. We want our systems to last. We want them to run efficiently. We hope this article serves that purpose and we welcome more feedback and suggestions!

Feel free to visit our Support Center at: https://www.compuclever.com/support/

If you have some ideas of topics you would like us to cover or have other feedback to offer, email us at: newsletter@compuclever.com


[1] http://www.ni.com/white-paper/5730/en/
[2] http://www.boston.com/metrodesk/2013/03/27/
[3] http://www.dailymail.co.uk

Filed Under: Newsletter, PC hardware, Windows tips Tagged With: CPU, Hardware, temperature, Wifi

Don't miss out

Get a copy of "5 Tips for a Fast PC" when you sign up for our free "PC Tips" newsletter.

Subscribe Now
Archive Newsletter

Recent Posts

  • Ultra File Opener 5.7 Release Note

    Ultra File Opener 5.7 Release Note

    July 24, 2018
  • How Blue Light Affects Your Health and What to Do About It

    How Blue Light Affects Your Health and What to Do About It

    May 11, 2018
  • How to Protect Your Privacy & Identity on Facebook – Part 2

    How to Protect Your Privacy & Identity on Facebook – Part 2

    April 18, 2018
  • Facing the Truth – Facebook & Privacy

    Facing the Truth – Facebook & Privacy

    April 7, 2018
  • Spectre and Meltdown:  Massive Security Holes Impacting All Mac and PC devices

    Spectre and Meltdown: Massive Security Holes Impacting All Mac and PC devices

    January 12, 2018
  • How to Fix Computer Sound Problems

    How to Fix Computer Sound Problems

    December 19, 2017
  • Correct Ergonomics Sitting at a Computer Desk

    Correct Ergonomics Sitting at a Computer Desk

    November 17, 2017
  • Five Useful Tips and Tricks for Windows 10

    Five Useful Tips and Tricks for Windows 10

    August 27, 2017
  • Going Incognito – Browse Web in Privacy Mode

    Going Incognito – Browse Web in Privacy Mode

    August 4, 2017
  • Don’t be Held at Ransomeware

    Don’t be Held at Ransomeware

    July 14, 2017
Contact Us | Privacy Statement | Terms of Use | EULA | Partner With Us | Uninstall | Blog
CompuClever© Systems Inc. 2023 All rights reserved.
Microsoft is a trademark of the Microsoft group of companies. All other trademarks are the property of their respective owners.